
As round up of the new security-focused features coming in the latest update to Azure SQL Database I also wanted to cover another feature the team has been working on and one I really love, Dynamic Data Masking (DDM).
Introducing Dynamic Data Masking
Here is Microsoft’s description of this feature…
Dynamic data masking helps prevent unauthorized access to sensitive data by enabling customers to designate how much of the sensitive data to reveal with minimal impact on the application layer. It’s a policy-based security feature that hides the sensitive data in the result set of a query over designated database fields, while the data in the database is not changed.
We’ve all seen (or built) applications which does this sort of thing in the past. In the apps where I’ve done this before the masking is done client-side. The difference (or improvement) here is this all happens server side. Best of all, configuring DDM is really easy and can all be done in the portal.
Implementing DDM
First, open the Azure Portal, http://portal.azure.com and provision a new Azure SQL Database v12.
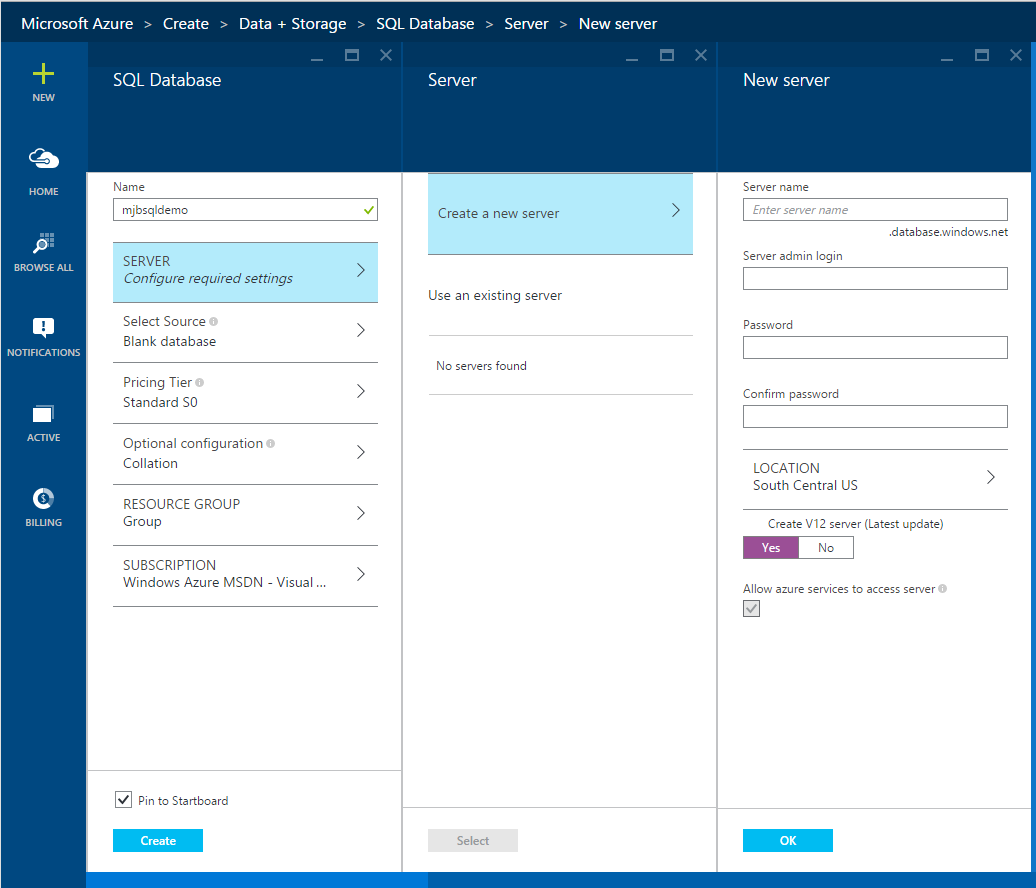
Create a new server to host the database and make sure you leave “Create a V12 server” checked as yes. The Preview for DDM is available on every Azure SQL DB price tier so feel free to select a Basic pricing tier if you’re following along. You can select defaults for the other settings, then click Create to provision a new database and server.
After the database has been provisioned we’ll create a new table called Customers and we’ll put some “sensitive” data in there we want to protect.
Next click on the “Open in Visual Studio” icon at the top of the database “blade” in the Azure Portal. This will open the Visual Studio blade. Before clicking on the big blue button we need to open the firewall so we can connect to the database. Click on the “Configure your firewall” link just below it.
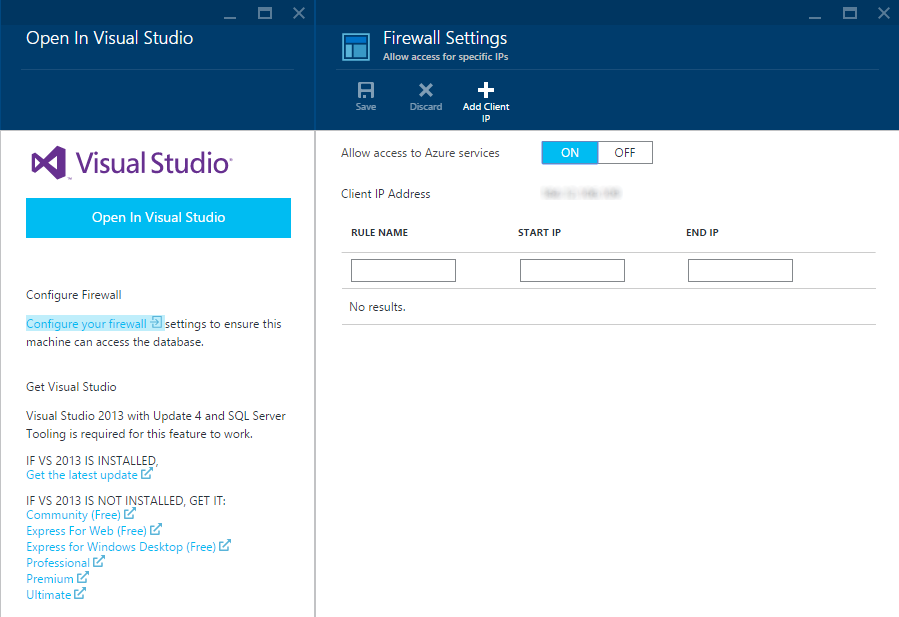
From the Firewall Settings click on the “Add Client IP” then click Ok. Return to the Open in Visual Studio blade, then click on the big blue, Open in Visual Studio button.
When Visual Studio opens you’ll be prompted to connect to the database. Enter the credentials to the database you just created and click Connect. In the SQL Server Object Explorer, open the Database and the Tables folder. Then right click the Tables folder and select, “Create new Table”

From here create columns for Name, Email, SSN, CreditCard and Telephone. In the T-SQL window below change the table name to Customers. At the top left of the design window click Update. Then in the next dialog click “Update Database”.
Now let’s add some data. Next refresh the Tables folder in the SQL Server Object Explorer. Our new Customers table should now appear. Right click it and select “View Data”.
Next enter some sample data into each of the columns. Be sure you enter appropriate data that the format expected for this data.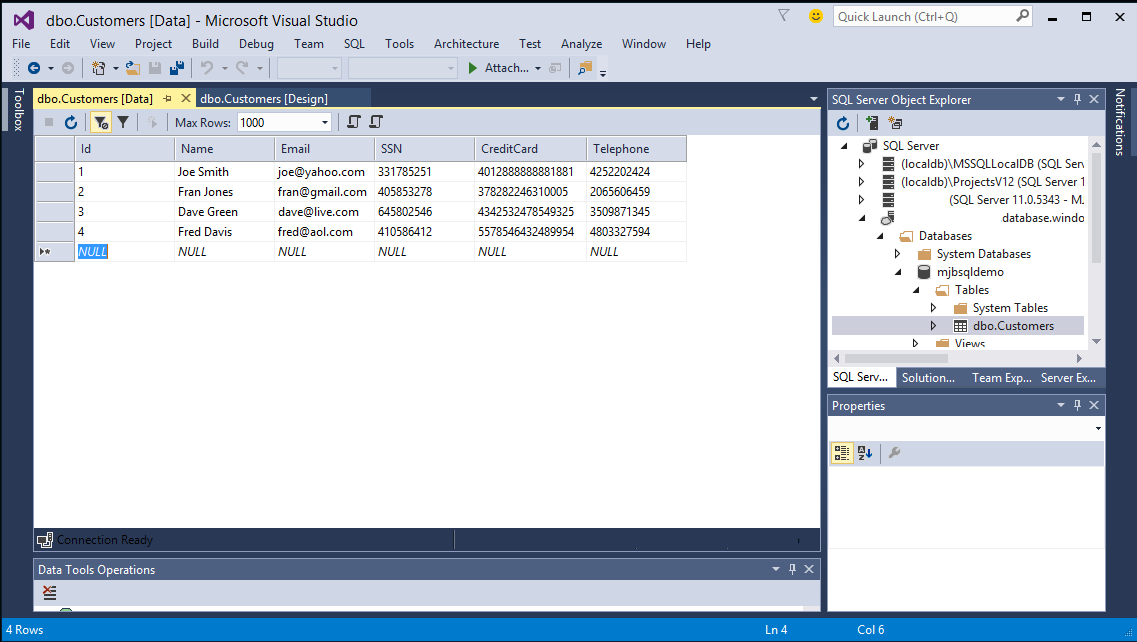
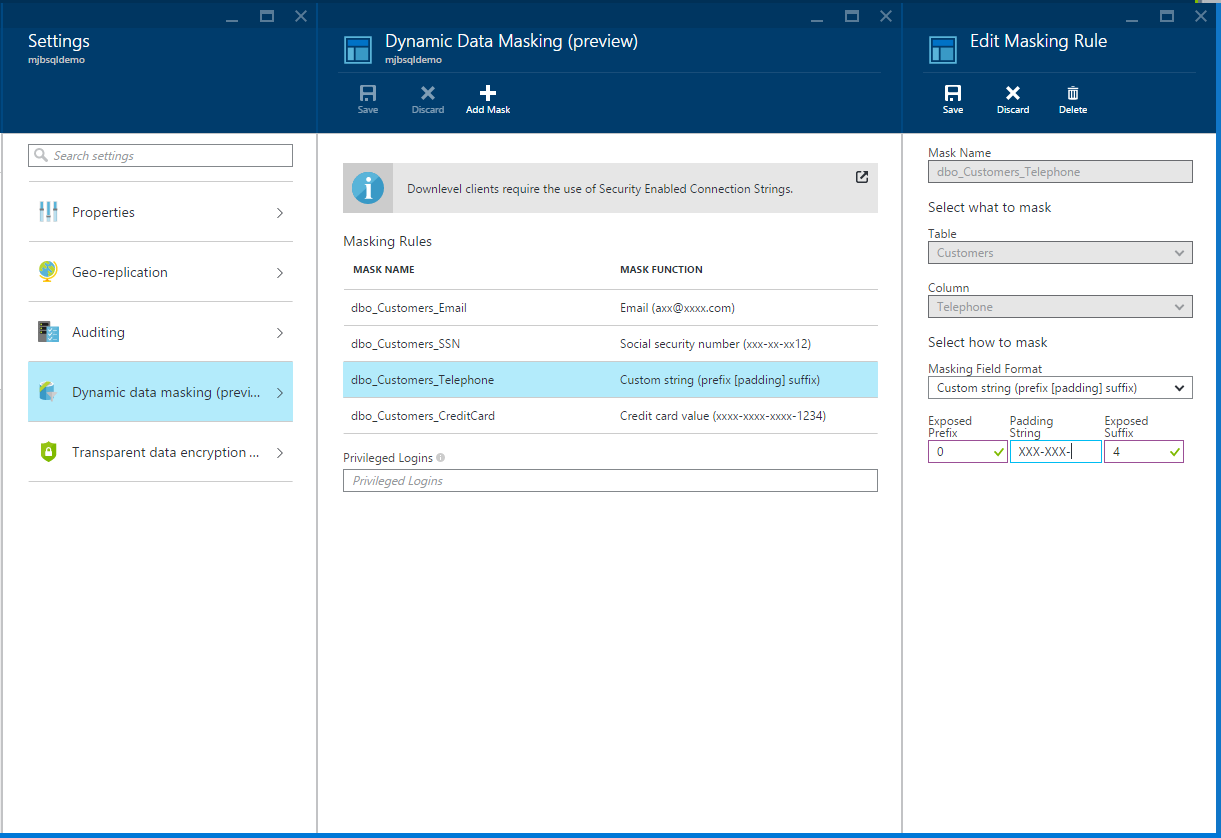
With our data entered let’s go back to the portal and configure DDM for this table. Open the Azure Portal and return to the Database blade. From there click, All Settings, Dynamic Data Masking (Preview), then click Add Mask to open up the Add Masking Rule blade.
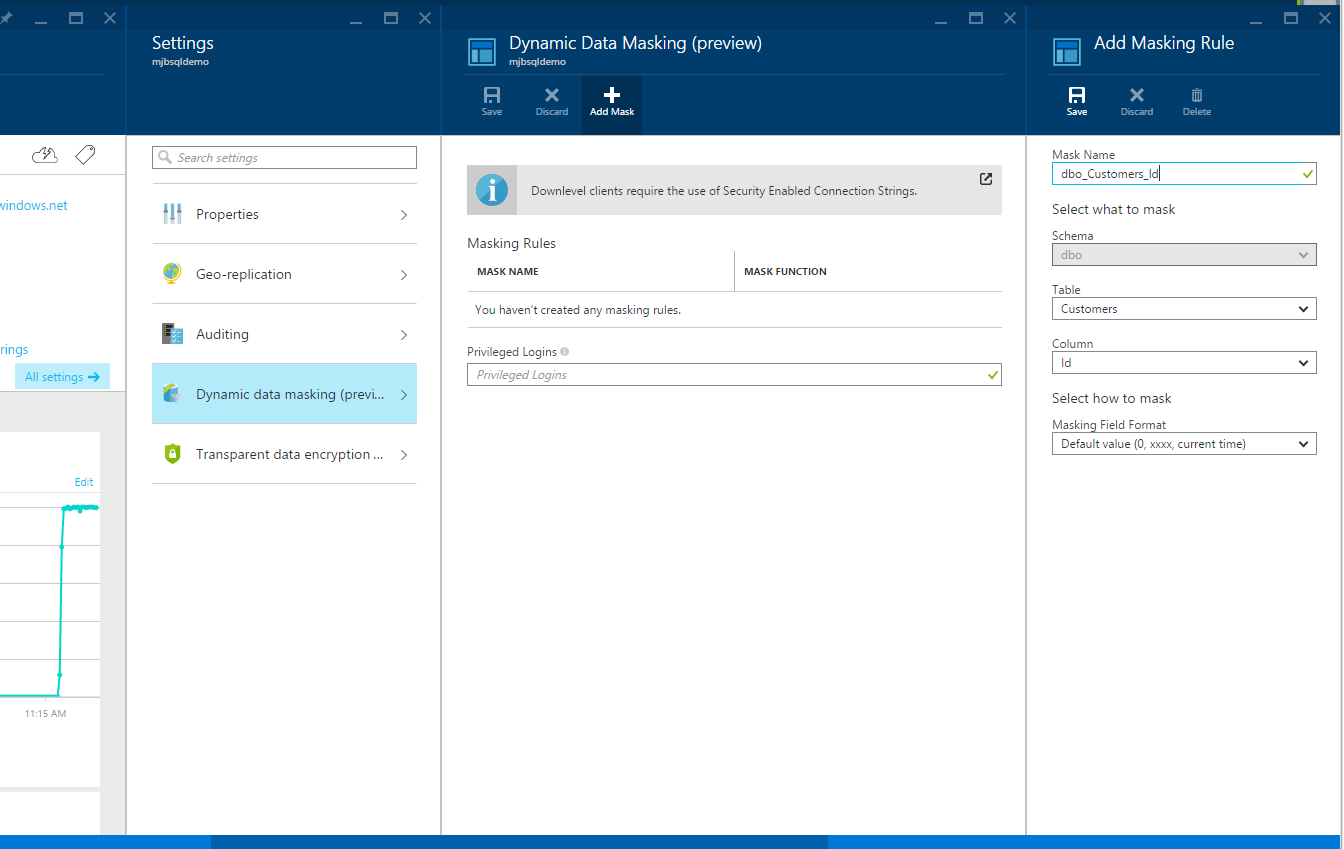
From here select the Customers table, then the Email column, then the Email mask. Finally click Save. Repeat these steps for the SSN and CreditCard columns. For the Telephone column, select the Custom string format. Enter 0 for the Exposed Prefix, then enter XXX-XXX- for the Padding String, and 4 for the Exposed Suffix. Click Save for the Add Masking Rule, then click Save again on the Dynamic Data Masking (Preview) blade to save all of the new masking rules.
Next, return to Visual Studio and close the Customers table if it is still open. Then right click the database and select Refresh and wait a moment while the connection is refreshed to the SQL Database.
Note: You may have noticed that the Customers table has disappeared. This is a bug in the SQL Server Object Explorer Visual Studio and applies to both Visual Studio 2013 as well as Visual Studio 2015 (but not SQL Server Management Studio). This should be fixed very soon and I’ll update this blog post when it is.
Even though we can’t see the table, it is still there. Right click on the database and select, New Query. In the query window type “select * from dbo.Customers” then click the green arrow to execute the query. Notice the data in the Results. It’s all been masked. Very cool. Best of all its ALL server-side. No changes to your app are required!!!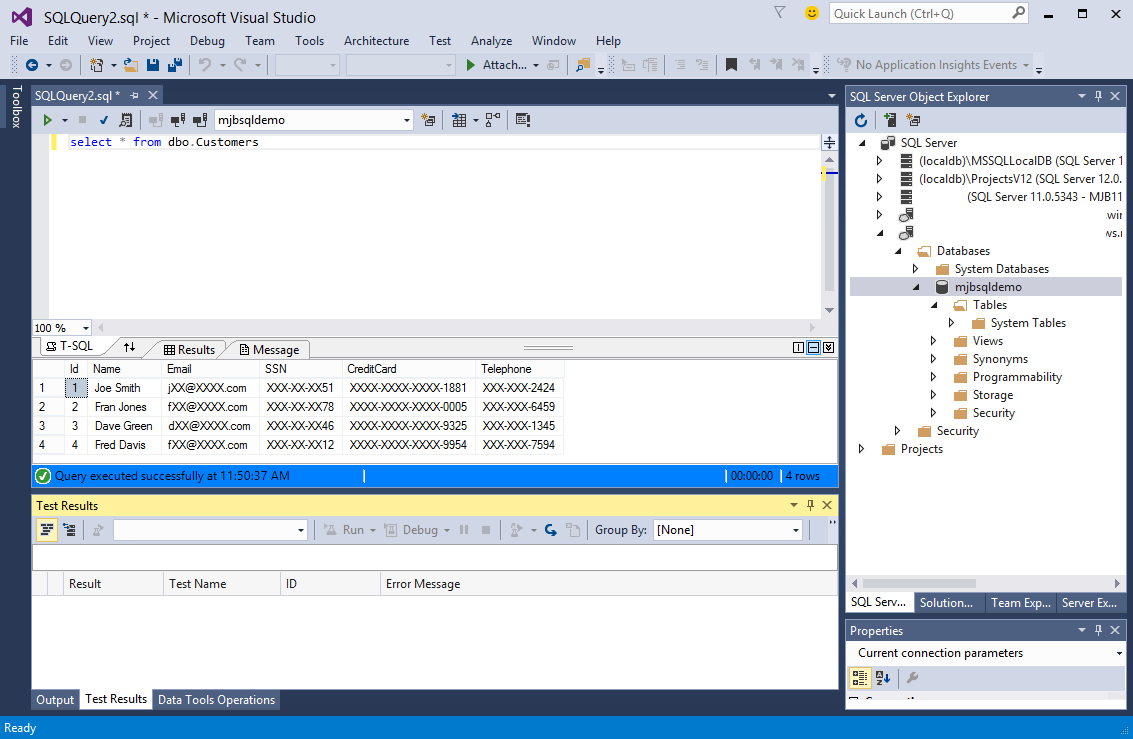
Some other handy things to know about DDM.
Privileged Logins
DDM has a Privileged Logins feature that allows you to add SQL logins for people who are excluded from getting masked results. Just add their logins (semi-colon delimited) to exclude them from getting masked results.
Down-level Clients
If you have applications that are built on .NET 4.0 or earlier you need to change your connection strings. You may also need to do this if you are using Node, PHP or Java. The new format is [mysqlserver].database.secure.windows.net. Notice the “secure” in the connection string now. If you are not using .NET 4.5 or higher read this article on DDM and down level clients.
Next Steps
If you’d like to learn more and get started with this feature you can start here, Get Started with Dynamic Data Masking. Note that this article is actively being updated so it may not quite match what I showed here but the information in this blog post is accurate.
That’s it. I hope you get some value out of this new feature.
Great overview, thanks!
Thanks, nice overview.
How is this compared with Datasunrise data masking?
http://www.datasunrise.com/data-masking-made-simple/
datasunrise has database firewall and auditing as well by the way.
thanks again