Hello Microsoft

So I suppose I can let the cat out of the bag as this becomes official in just a few hours.

I am rejoining Microsoft over in the Azure Networking engineering team.

My first day back is Monday, February 29th. I get to go to NEO (new employee orientation) again nearly 15 years after my first NEO. I wonder if they teach new employees to not BCC large DLs now.

I’m very excited to be returning and very happy to be returning in engineering. Marketing was fun but building and being a product owner is my passion and I am really looking forward to be joining a great team.


FacebooktwittermailFacebooktwittermail

Automating Backups with WebJobs and Data Movement Library

This post is an update to a post and app I wrote last Summer, Automating Backups with Azure WebJobs and AzCopy.

In this post I will show you how you can combine Azure WebJobs with the Data Movement Library to build your own scheduled storage backup or copy service for blobs.

Get the source for this blog post here, AzureDmlBackup.

Credits

Before we start I want to call out and thank Pranav Rastogi, and Longwen Lu who reviewed this application, provided some key insights into WebJobs and DML.

What is the Data Movement Library

The Data Movement Library for .NET (DML) is a library that based on core of the popular AzCopy utility created by the same team. With DML you can write fully managed applications with the power of AzCopy and with the ability to highly customize how it works. Currently DML supports Azure Blobs and Files. You add DML to your project via nuget. The source for DML is on GitHub and there is also a helpful repo of DML samples too.

Azure WebJobs

If you are not familiar with Azure WebJobs you should stop reading this, drop everything and go check them out right now. It’s ok, I’ll wait…. Azure WebJobs is a framework for running background tasks. You can trigger a job to run on a schedule, from a queue message, a new blob object, or a through pretty much anything using WebJobs Extensions. In short, WebJobs are amazing and extremely flexible.

The WebJobs team works at a pretty fast clip and are constantly updating and adding new features to it. Many of the newer features are brought about via the Extensions SDK I just mentioned. They also have support for multiple means to scheduling them including cron.

Exploring AzureDMLBackup

Let’s walk through the app, explaining some of the pieces.

Project Structure

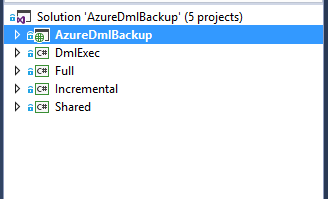
If you’re familiar with the AzCopy & WebJobs app I built last year, the solution structure here should look familiar. There are three WebJob projects (Full, Incremental, DmlExec), a project (Shared) with a single shared class, and a host Web App project (AzureDmlBackup) which the WebJobs are deployed into.

SolutionView

Full and Incremental Projects

The Full and Incremental WebJobs are very simple. They write messages onto a queue that describes what to copy. The projects are nearly identical but different in two key areas. The Full project includes a flag “IsIncremental” that is set to false. When it is false the DmlExec will always overwrite the destination file. If is is true, DmlExec will check to see if the source is newer. If it is, it will overwrite it, otherwise it skips it.

The other reason there are two projects and not one is Full is run on-demand and Incremental is run on a schedule using a settings.job file. Incremental is scheduled to run every Monday – Thursday at 23:30 UTC (everything in Azure is on UTC time). WebJobs now support multiple ways to trigger them via a schedule. Read more on WebJobs scheduling capabilities at TimerTriggers.

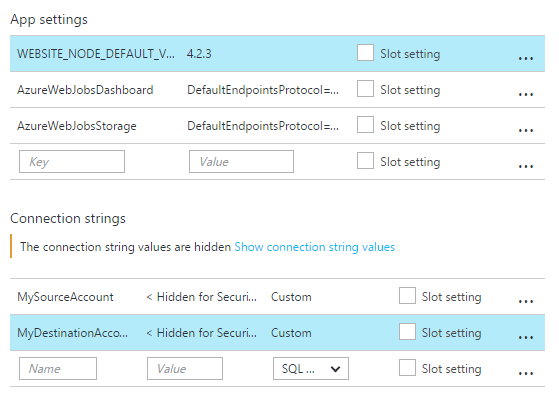
The Full and Incremental projects use “tokens” to identify the source and destination Azure storage accounts from which to copy. The tokens are stored in the Connection Strings of the host Web App in the Azure Portal.

Within either project you define your source and destination accounts, then repeatedly call the CreateJob() function passing a container you want to copy. I do this for three reasons.

  1. It is easier to update the connection strings in the portal rather than redeploying the application.
  2. They are or can be shared across Full and Incremental so rather than putting them twice in each project’s app.config I put them in a single location.
  3. I did not want to leak secrets using a queue. A queue can be secure but it seems an unnecessary risk if one storage account is compromised then others would be as well. By using tokens it reduces a potential vector.

AppSettings

DmlExec Project

The DmlExec is the other main project in this solution and where we will spend the rest of this blog post. This project is a continuously running WebJob. It listens to a queue to read and process new messages created by the Full or Incremental WebJobs. There are a number of classes in this project besides the normal Program and Functions classes for WebJobs.

This solution uses the logging feature in WebJobs extensively. To keep the code cleaner, the code for logging is in a helper class, Logger. There is also a class called, TransferDetail. This is used to collect errors on individual blobs during copy operations. After the job is complete the Logger class writes its contents to the WebJobs log if there are any files which were skipped or that failed. Lastly, there is a class called ProgressRecorder. This class is used by DML to collect data on the files that are copied successfully, skipped or failed. It also times the entire copy operation. When the job is complete its contents are written to the WebJobs log.

Performance Tuning

The DML has a number of settings you can tweak to improve performance of the copy operations. I did a large amount of testing to confirm the settings I used in this solution. The Azure Storage team was also very helpful in understanding what the optimal settings were for DML.

Performance

ParallelOperations

ParallelOperations tells DML how many worker threads to use when copying. For the CopyDirectoryAsync() function this solutions uses, the parallel operations are the ones copying blobs from one storage account to another. From the Azure Storage Team:

We use a producer-consumer pattern to list and transfer blobs. Basically, there are two threads: One lists blobs from the source container and add them into a blocking queue. This thread will be blocked if the queue reaches its size limitation. Another thread get blobs out of the queue and start a worker thread to copy the blob. This thread maintains a counter of the outstanding workers and block itself for a while if it reaches the parallel limitation.

I tested a number of values for this setting. What I found (and confirmed by the Azure Storage Team) was the optimal value for this is 8 parallel operations per processor. If you want to increase the number of copy operations over a period of time, the best way is to scale up the size of your VM so have more processors. Performance will increase at a near linear rate.

DefaultConnectionLimit

Another setting that goes hand in hand with ParallelOperations is DefaultConnectionLimit for the ServicePointManager. This setting limits the number of connections your application has and its value should match the number of parallel operations. If you think about it, this makes perfect sense. If you have more worker threads than connections the workers are going to sit and wait for a connection to become available. If you have more connections than workers then you are not allocating all available resources to copy blobs. By making them the same then each thread gets its own connection to Azure Storage and you get the most efficient use of resources.

IsServiceCopy

IsServiceCopy is a parameter that is set when calling one of the “Azure to Azure” copy functions in DML. CopyBlobAsync(), CopyDirectoryAsync(), etc. When this value is true the copy will be offloaded and executed completely server side in Azure. When it is false the copy is executed locally. It may seem tempting to set this to true all the time however there are some trade-offs when doing this. If this value is set to true, the copy is executed using available bandwidth. In some cases this may result in much slower performance than if you had set the value to false. Important to know that when this value is true, there is no SLA on your storage access.

I tested this extensively and in my opinion you are better off to set this value to false and copy the blobs using local resources and connections. The performance is more predictable and you will get bandwidth and performance up to the quota limits for the Storage Service.

TransferContext and TransferCheckpoint

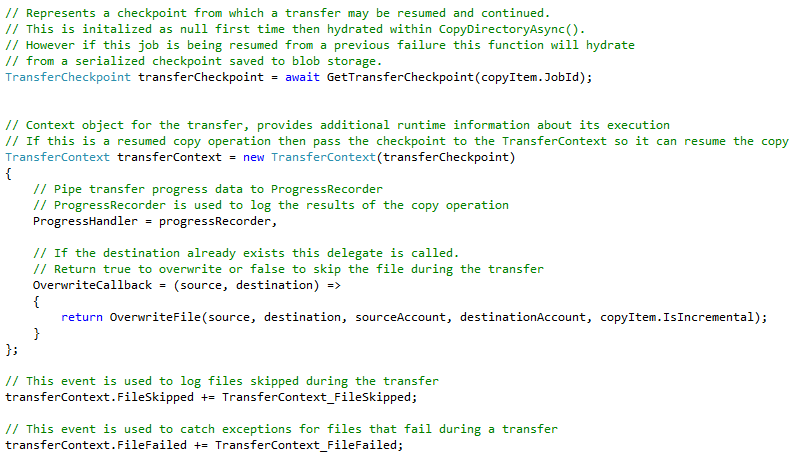
The TransferContext is the context object for the the copy operation. It is used to get information about its execution. It also provides a delegate which is called by DML when it encounters an overwrite during the copy. Lastly it provides three event handlers that are called as each file is copied between two storage accounts.

TransferContext

ProgressHandler

ProgressHandler is a delegate that can be used to capture information about the copy operation including bytes transferred, number of files transferred, skipped, or failed. You can see the example provided by the Storage Team in their DML Samples repo. I wanted to get performance metrics for my solution so I also included a start and end time in my implementation and then emit an Elapsed Time in the ToString() override.

OverwriteCallback

OverwriteCallback is a delegate that is called by DML when it encounters a file to overwrite during a copy operation. The delegate provides a source and destination parameters which are the URI’s to their respective objects to copy. The delegate accepts a true or false in return. Setting it to true will overwrite the file. Setting it to false will skip the file.

In my implementation, when IsIncremental is set to true, I use this delegate to check whether the source file is newer than the destination. If it is newer I return true and the destination is overwritten. If it is not, then I return false and the file copy is skipped. When IsIncremental is false I don’t check if the source is newer and just overwrite the file.

If you are copying a container or directory that you have already copied before you can get some significant performance improvements by setting IsIncremental to true.

Because the OverwriteCallback is only called if the destination exists, you do not need to use the Full WebJob to copy a container for the first time, you can use the Incremental one if you want. There is no performance penalty. Only use Full if you need to force an overwrite.

Event Handlers

The TransferContext includes three event handlers, FileTransferred, FileSkipped and FileFailed. All three of these are called as each file is copied. This solution does not hook into FileTransferred as it represents files that were successfully copied.

FileSkipped is called when a file is skipped in the OverwriteCallback as discussed above. In this solution we catch this event and collect information on each file that is skipped and the reason for it. When a file is skipped via the OverwriteCallback the message is always going to be, “Destination already exists”. After the copy is complete the app checks to see if the List object that is collecting each of the skipped files has a count > 0, if it does it writes out its contents to the WebJobs log.

The last event is FileFailed and it is called when a file fails to copy. Just like in FileSkipped the file information and the exception message are collected in a List and then written it to the WebJobs log when the copy operation is complete.

However, there is more to this and to exception handling in general using DML. Let me explain

Exception Handling

Normally in an application you have a catch block that catches an exception and you handle it. However, with DML since the calls to it are long running operations that can span thousands of individual copy operations this approach does not work. There is also one other complicating factor.

TransferException

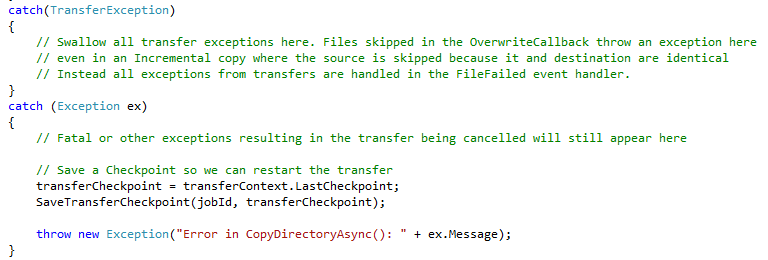
When an exception occurs in DML and a file fails to copy, DML does not stop the copy operation unless something fatal occurs and causes the entire job to be cancelled or failed. When a file fails DML raises a “TransferException”. If you call CopyDirectoryAsync and await it, the function will throw this TransferException. However if you want to log the files and their reasons for failing it is too late to do so. This is one reason why there is an event handler that is called for each individual file copy.

The other complicating factor in all this is that if you skip a file using the OverwriteCallback DML will also throw a TransferException. What’s more it will use the very same Transfer Error Code, SubTransferFailed. This makes catching and swallowing a skipped file impossible if you were looking to simply catch the TransferException.

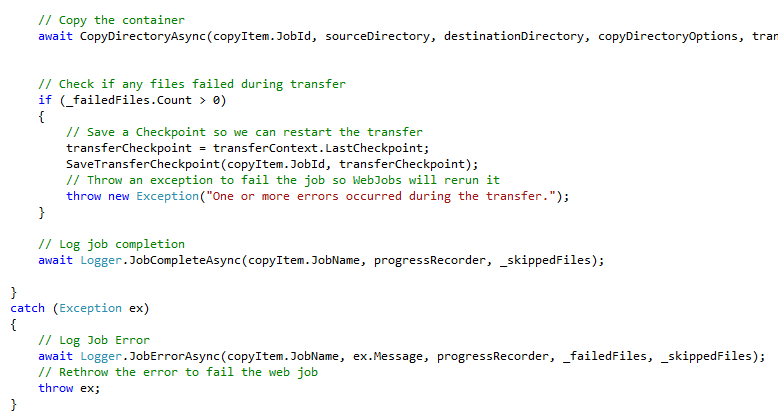
The solution is to use the FileFailed event and set a flag which you then check after the copy is completed. This is precisely what I am doing in this code below.

CheckForFailedFiles

It also allows us to do something that is a really cool feature of DML, restarting copy jobs where they left off.

TransferCheckpoint

One of the coolest objects in DML is the TransferCheckpoint. The TransferCheckpoint hangs off the TransferContext and it provides a means for recording which files copied and which did not. Best of all, you can serialize this object and persist it to, say, blob storage, then by leveraging the WebJobs capability of rerunning a WebJob that fails you can retry the copy operation. But instead of retrying thousands of files all over again, you are only copying the files that failed the first time which is much more efficient and faster.

When one or more files fail to copy, the Checkpoint is stored in the WebJobs Storage Account in a container we create “dmlcheckpoints”. Each time a WebJob is run, it checks that container to see if there is a file with the same Job Id as the current WebJob. If there is, the app knows this invocation is a rerunning of a previously failed WebJob. It then retrieves the CheckPoint and hydrates the TransferContext through its constructor. From there DML handles the rest. Everything else is exactly the same.

Other things

There are a few other things that are interesting to point out with this application.

Transient Fault Handling

DML has built in transient fault handling for its own copy operations. However the app needs to access Azure Storage on its own behalf as well so this application implements transient fault handling on Azure Storage as well and uses it for all calls to Azure Storage it makes.

WebJobs Storage Connections

While WebJobs allows you the option of putting the AzureWebJobsDashboard and AzureWebJobsStorage account connection strings in many locations, this solution does not. The app is written to read these connection strings from the App Settings from the host web site.

Closing

So that’s it. I hope you enjoy playing with this solution and with WebJobs and DML in general. The source for this is here AzureDmlBackup.

FacebooktwittermailFacebooktwittermail

Exploring Azure SQL DB Dynamic Data Masking

As round up of the new security-focused features coming in the latest update to Azure SQL Database I also wanted to cover another feature the team has been working on and one I really love, Dynamic Data Masking (DDM).

Introducing Dynamic Data Masking

Here is Microsoft’s description of this feature…

Dynamic data masking helps prevent unauthorized access to sensitive data by enabling customers to designate how much of the sensitive data to reveal with minimal impact on the application layer. It’s a policy-based security feature that hides the sensitive data in the result set of a query over designated database fields, while the data in the database is not changed.

We’ve all seen (or built) applications which does this sort of thing in the past. In the apps where I’ve done this before the masking is done client-side. The difference (or improvement) here is this all happens server side. Best of all, configuring DDM is really easy and can all be done in the portal.

Implementing DDM

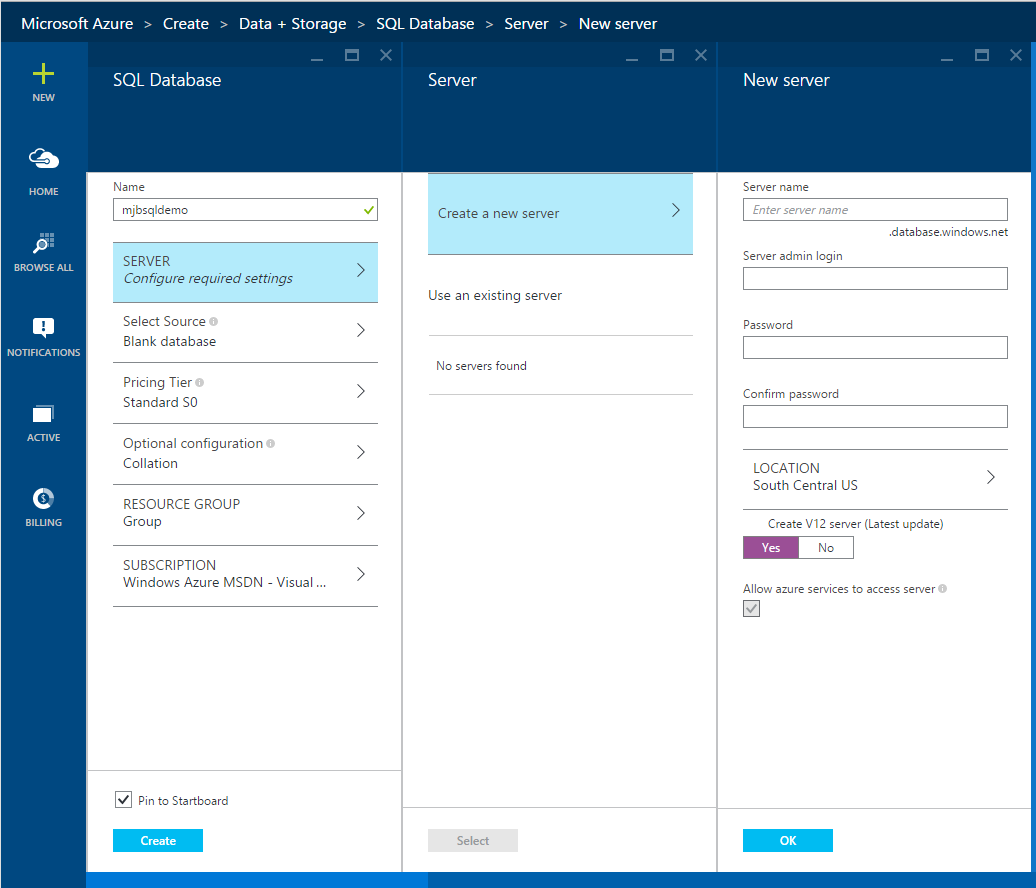
First, open the Azure Portal, http://portal.azure.com and provision a new Azure SQL Database v12.

CreateNewSQLDB

Create a new server to host the database and make sure you leave “Create a V12 server” checked as yes. The Preview for DDM is available on every Azure SQL DB price tier so feel free to select a Basic pricing tier if you’re following along. You can select defaults for the other settings, then click Create to provision a new database and server.

After the database has been provisioned we’ll create a new table called Customers and we’ll put some “sensitive” data in there we want to protect.

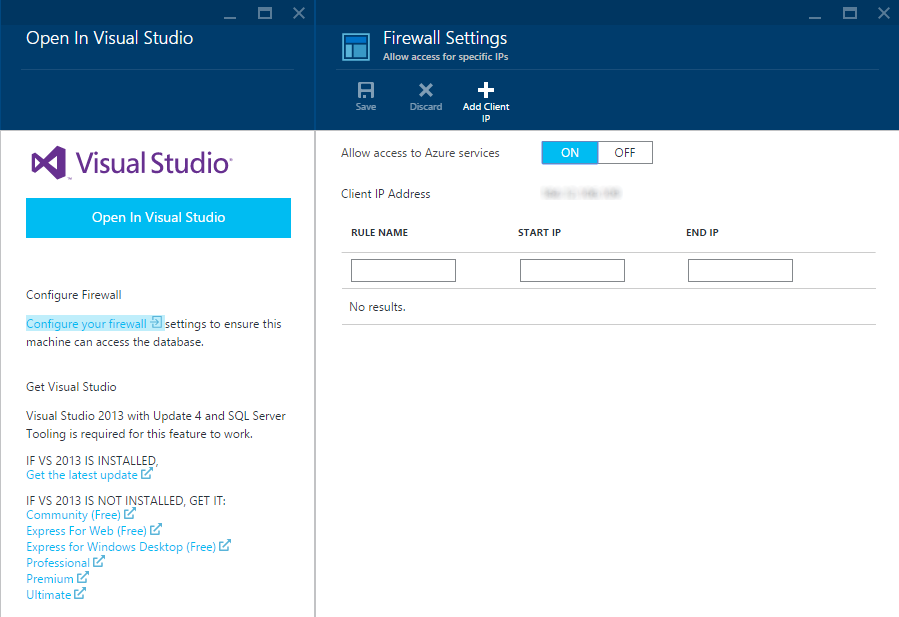
Next click on the “Open in Visual Studio” icon at the top of the database “blade” in the Azure Portal. This will open the Visual Studio blade. Before clicking on the big blue button we need to open the firewall so we can connect to the database. Click on the “Configure your firewall” link just below it.

FireWallSettings

From the Firewall Settings click on the “Add Client IP” then click Ok. Return to the Open in Visual Studio blade, then click on the big blue, Open in Visual Studio button.

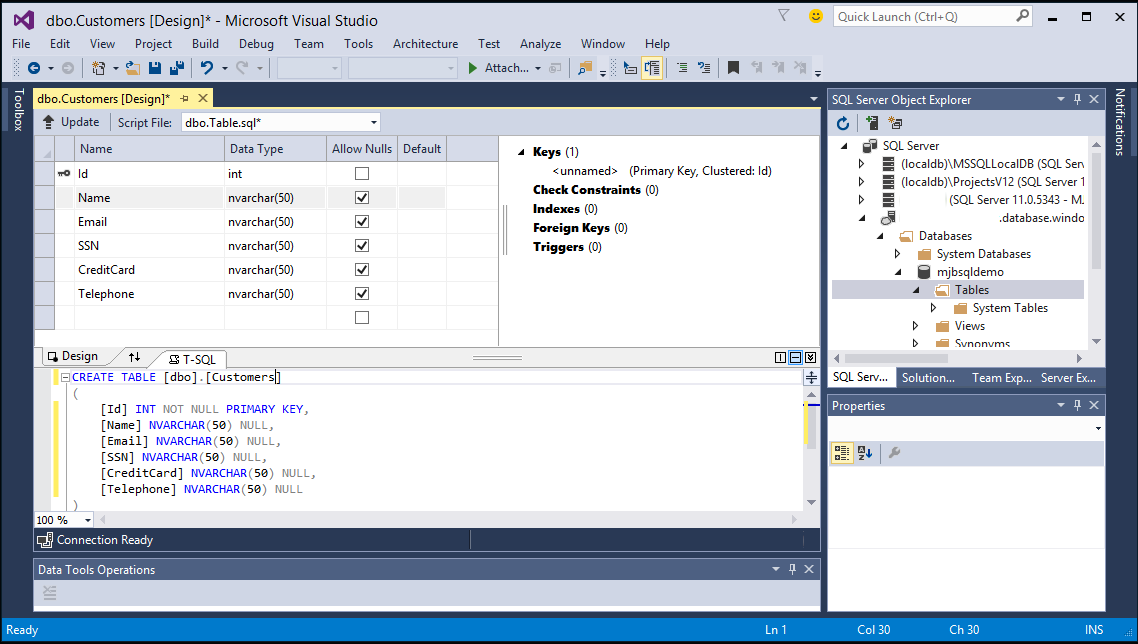
When Visual Studio opens you’ll be prompted to connect to the database. Enter the credentials to the database you just created and click Connect. In the SQL Server Object Explorer, open the Database and the Tables folder. Then right click the Tables folder and select, “Create new Table”

CustomerTable

From here create columns for Name, Email, SSN, CreditCard and Telephone. In the T-SQL window below change the table name to Customers. At the top left of the design window click Update. Then in the next dialog click “Update Database”.

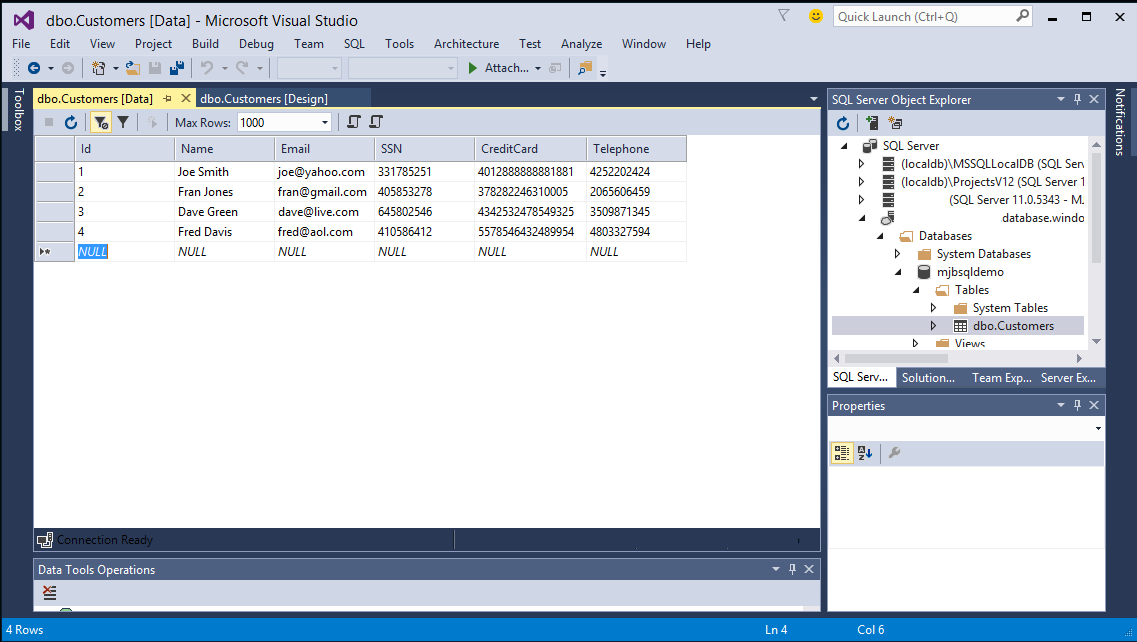
Now let’s add some data. Next refresh the Tables folder in the SQL Server Object Explorer. Our new Customers table should now appear. Right click it and select “View Data”.

Next enter some sample data into each of the columns. Be sure you enter appropriate data that the format expected for this data.CustomerData

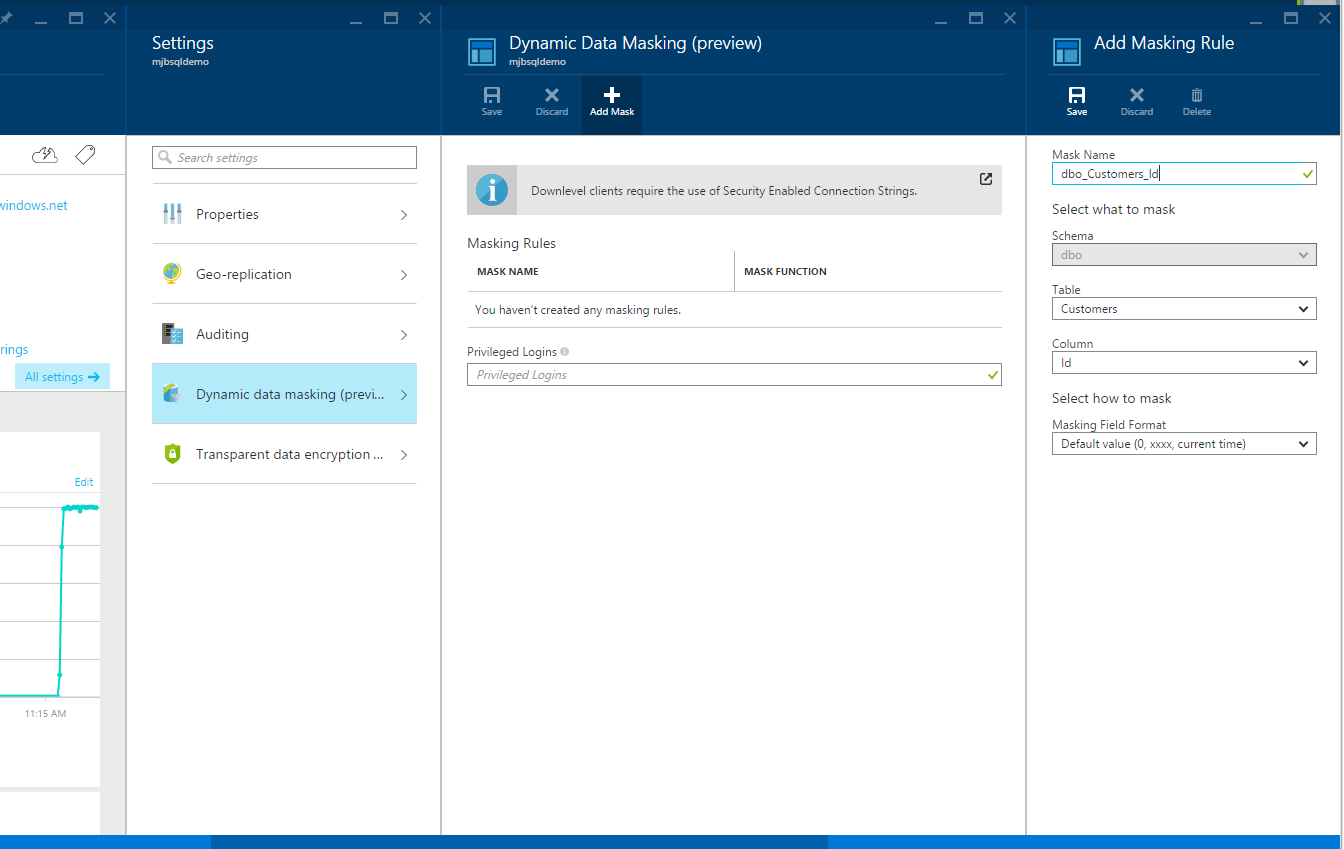
With our data entered let’s go back to the portal and configure DDM for this table. Open the Azure Portal and return to the Database blade. From there click, All Settings, Dynamic Data Masking (Preview), then click Add Mask to open up the Add Masking Rule blade.

DDMBlade

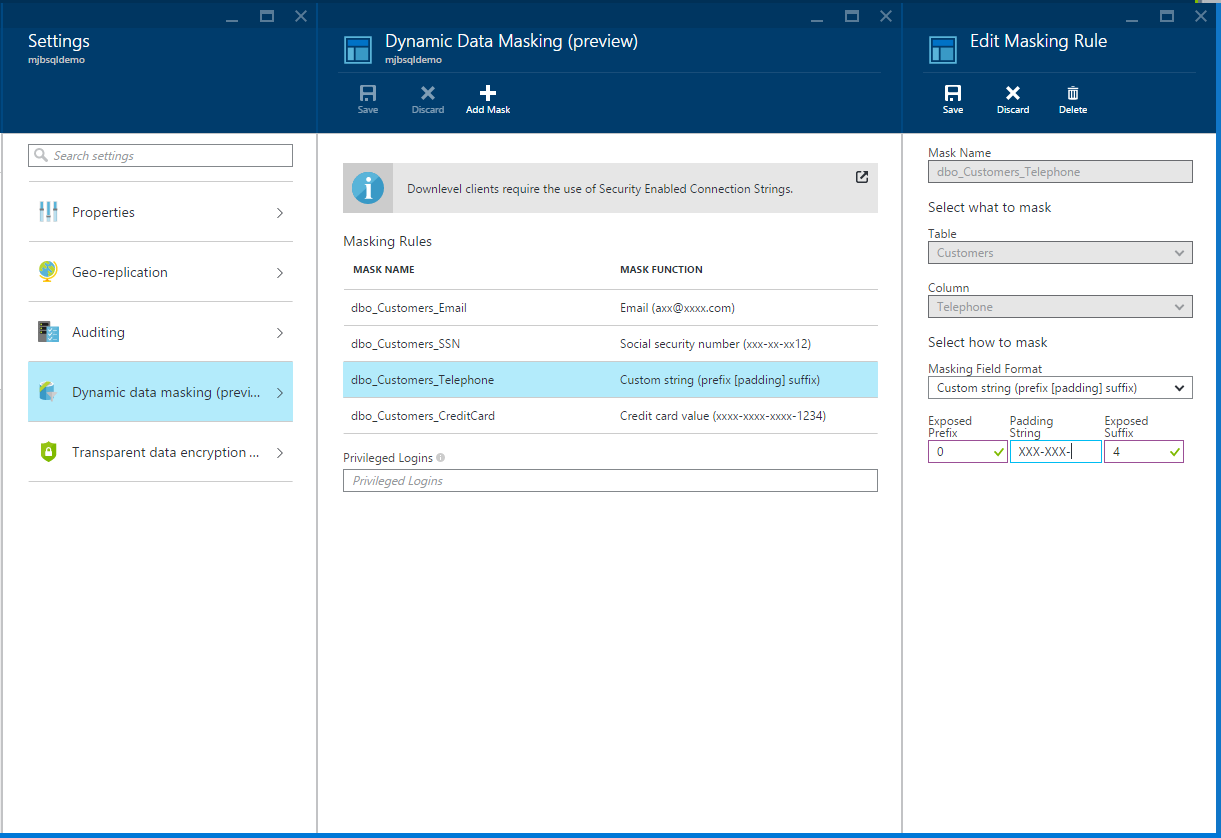
From here select the Customers table, then the Email column, then the Email mask. Finally click Save. Repeat these steps for the SSN and CreditCard columns. For the Telephone column, select the Custom string format. Enter 0 for the Exposed Prefix, then enter XXX-XXX- for the Padding String, and 4 for the Exposed Suffix. Click Save for the Add Masking Rule, then click Save again on the Dynamic Data Masking (Preview) blade to save all of the new masking rules.

DDMTelephoneMask

Next, return to Visual Studio and close the Customers table if it is still open. Then right click the database and select Refresh and wait a moment while the connection is refreshed to the SQL Database.

Note: You may have noticed that the Customers table has disappeared. This is a bug in the SQL Server Object Explorer Visual Studio and applies to both Visual Studio 2013 as well as Visual Studio 2015 (but not SQL Server Management Studio). This should be fixed very soon and I’ll update this blog post when it is.

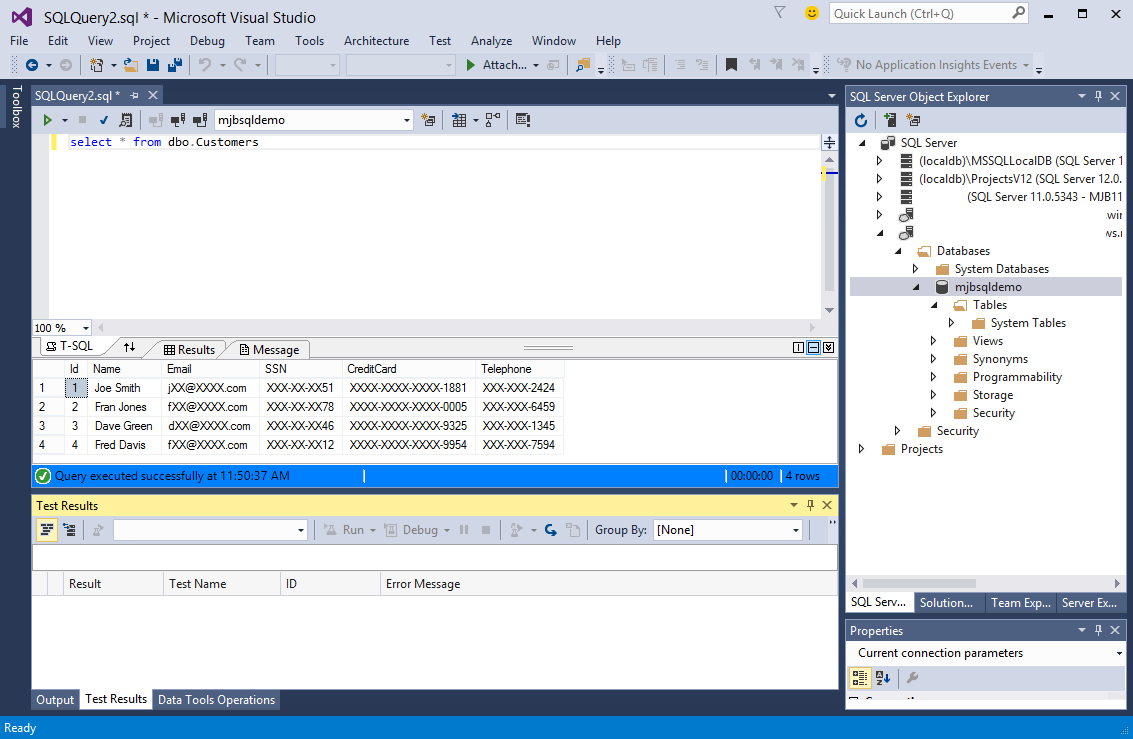
Even though we can’t see the table, it is still there. Right click on the database and select, New Query. In the query window type “select * from dbo.Customers” then click the green arrow to execute the query. Notice the data in the Results. It’s all been masked. Very cool. Best of all its ALL server-side. No changes to your app are required!!!DDMMaskResultsinVS

Some other handy things to know about DDM.

Privileged Logins

DDM has a Privileged Logins feature that allows you to add SQL logins for people who are excluded from getting masked results. Just add their logins (semi-colon delimited) to exclude them from getting masked results.

Down-level Clients

If you have applications that are built on .NET 4.0 or earlier you need to change your connection strings. You may also need to do this if you are using Node, PHP or Java. The new format is [mysqlserver].database.secure.windows.net. Notice the “secure” in the connection string now. If you are not using .NET 4.5 or higher read this article on DDM and down level clients.

Next Steps

If you’d like to learn more and get started with this feature you can start here, Get Started with Dynamic Data Masking. Note that this article is actively being updated so it may not quite match what I showed here but the information in this blog post is accurate.

That’s it. I hope you get some value out of this new feature.

FacebooktwittermailFacebooktwittermail

Could Azure SQL DB Transparent Data Encryption have helped Ashley Madison?

It seems like the news is plastered with a never-ending rash of hacks against companies with hackers stealing their data. The range of companies is pretty diverse too. Ranging from “dating” websites like Ashley Madison all the way up to the US Government’s Office of Personnel Management. These days it doesn’t matter what kind of company you are or what country you live in. If you are storing data, it is valuable to somebody. The more sensitive the data, the more valuable.

As I peruse the list of hacks against these companies and governments there is something I notice. It appears they are, at best, only partially protecting their data once you get into their network. In other words, if you get in to their network and possibly past some other protection or rudimentary policies, you basically have access to their data.

If you’ve ever spent any time thinking or implementing security strategies you’ve heard of the Defense in Depth strategy. This strategy says that you should implement multiple, independent methods for securing your assets. As is usually the case, the ultimate assets is your data. For most companies, this is stored in one or more databases.

The Azure Data Platform Team has been doing some great work on bringing some of the security-focused features in SQL Server to Azure SQL Database v12. I am especially happy to see them release Transparent Data Encryption and Dynamic Data Masking into Preview for customers to start exploring (in fact I’ll write about Dynamic Data Masking in another blog post here soon)

Going through these new features in Azure SQL DB and as I read the ongoing deluge of stories of companies like Ashley Madison, the US Government, etc. the question I pondered was, if any of them had implemented encryption on their data at rest, would they have fared better from these attacks? While I can’t be absolutely sure, the likely answer is yes. The question you may be asking is whether you should implement it. The answer there is a resounding YES! I’ll show you how in the balance of this post.

Introducing Transparent Data Encryption

New to Azure SQL Database is a feature (now in Preview) called, Transparent Data Encryption (TDE). In Microsoft’s own words,

Transparent Data Encryption protects against the threat of malicious activity by performing real-time encryption and decryption of the database, associated backups, and transaction log files at rest without requiring changes to the application.

In other words, TDE encrypts the data in your database on the physical disk. Meaning that even if an intruder got past your perimeter and network security protocols and were able to access the physical storage for the database, they would still not have access to your databases because they are encrypted. In addition, TDE is implemented with no changes to your application’s code, or any other security measure you have already implemented, meaning this strategy is independent of any other Defense in Depth strategy, a key tenant to a well executed Defense in Depth effort.

How it works

The encryption itself is done using a symmetric key, AES-256. In addition the key is changed every 90 days which is a nice touch. But given it would take billions of years and nearly unlimited super-computing power to crack AES-256, not completely necessary. As your data is written to disk, Azure encrypts the data using Intel’s AES-NI hardware support. This helps ensure really good performance and also reduces the overhead in DTU’s needed to encrypt and decrypt the data. In fact, I can’t see a difference when I test query performance. Another benefit, and one that you get by using TDE in Azure versus on-premises SQL Server, is that you don’t have to manage the keys. Azure manages them for you.

How do I implement it?

Implementing a database with TDE is pretty simple and there are multiple ways you can enable TDE on a database using T-SQL, PowerShell or the Azure Portal. We’ll explore how to do it using the Azure Portal method in this post.

First, open the Azure Portal, http://portal.azure.com and provision a new Azure SQL Database v12.

Create a new server to host the database and make sure you leave “Create a V12 server) checked as yes. TDE is available on every Azure SQL DB price tier so feel free to select a Basic pricing tier if you’re following along. You can select defaults for the other settings, then click Create to provision a new database.

After the database has been provisioned you can restore an existing database into this one or create some tables with some data you want to encrypt if you want to hook it up to a client application and run it. This isn’t necessary though because you will not notice any difference in your applications.

Now that we have some data to protect, let’s go encrypt it. Return to our database blade in the Azure Portal. Next click on the All Settings link in the Essentials section of the blade.

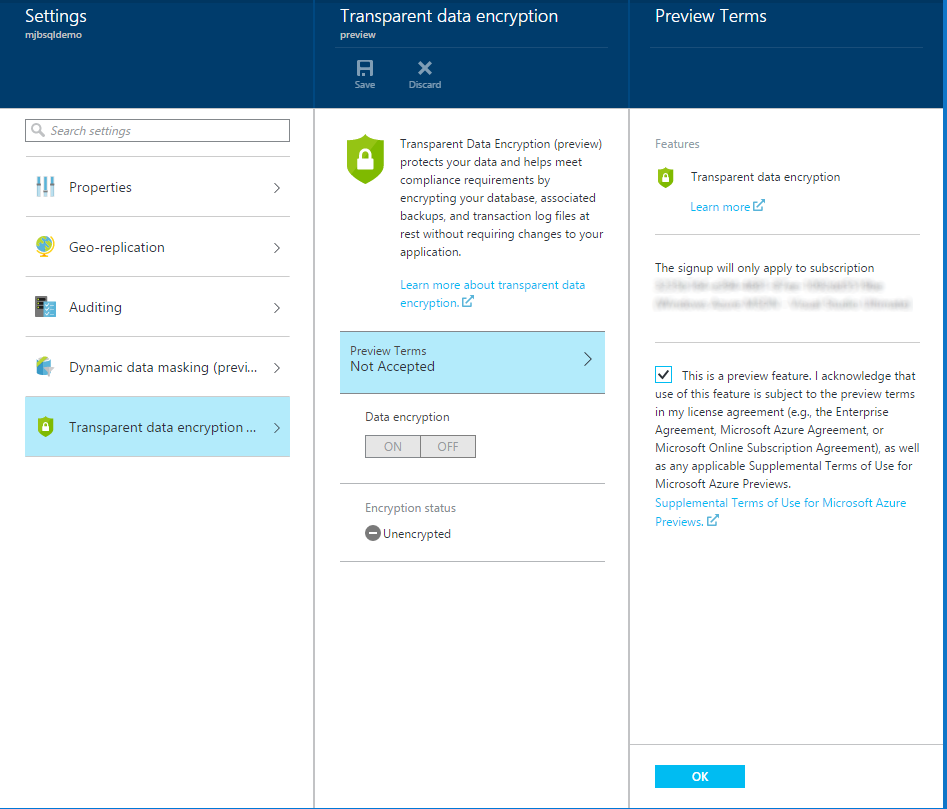
TDEAccept

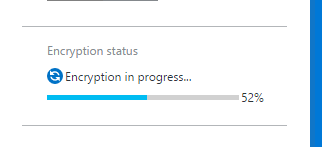
From there, click on the Preview Terms, check the box and click Ok. Then enable Data encryption by clicking On, then click Save at the top of the blade. The Encryption status will then change to show a percentage complete to mark the progress as it encrypts your database.

EncryptInProgress

After a few moments this will change and turn green. The database and all the data within it is now encrypted.

EncryptedGreen

That’s it! Pretty easy. The best part is, you don’t have to modify your applications to enjoy having your data encrypted at rest in Azure. You can even write queries that do joins on encrypted columns.

So back to my question. Would this have helped Ashley Madison? Well since the feature is only just recently released to Preview then I would say no. They certainly should have had some encryption at rest strategy. TDE is a part of obtaining PCI-DSS compliance after all so you’d at least need it on the financial data. But if you’re an engineer for a company that stores their data in the cloud I would definitely take a look and explore this feature and if you manage on-premises database in SQL Server I would definitely recommend using this feature as it is too simple not to.


FacebooktwittermailFacebooktwittermail

Fixing Bad Address Errors Setting up Azure Service Fabric

I am going to be doing some work with the Azure Service Fabric Preview and so today I went and installed and configured a local cluster so I can get to working with it. The directions for the installation is pretty simple but I came across an error that confused me for a while. I found the solution and wanted to share it. Here’s what I did below.

First step is navigating to the Service Fabric Docs on Azure.com and following the directions to install the Service Fabric bits and SDK locally.

Second is run the PS script that sets up the local cluster environment. It was here I ran into some issues following the directions as written. in Powershell I saw some weird errors talking about paths. I launched the Service Fabric Explorer and when I clicked on a Node I got this error.SFPathError

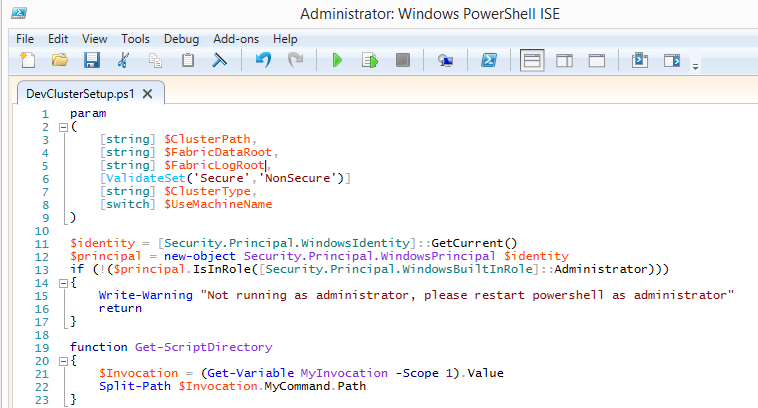
I went an opened the cluster setup script in the PS editor and started looking around. It looks like this below. Notice the first three parameters in this script. This sets the path where the local cluster is configured on your machine.

SF-DevClusterSetupScript

Now normally, when this script runs (and you just leave it to its defaults), it creates this directory, C:\SfDevCluster. It then creates /Data and /Log directories underneath this and some other stuff too.

Looking back in Windows Explorer I see that C:\SfDevCluster was created just fine and there was also a \Manifest directory. However the script also wants to create a \Data and \Log directory and these had not been created. This explained the error I was seeing. Of course it would complain about a bad address. The address was actually a path that didn’t yet exist.

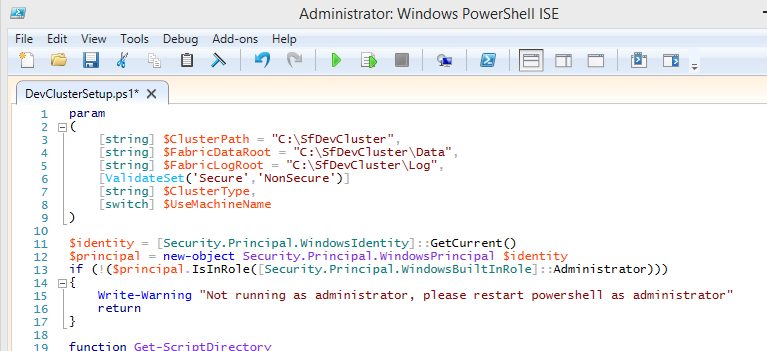
The fix? (or at least a fix that fixed it for me) I just entered the paths into those first three variables that the script wanted to use by default anyway. So after I edited the PS script this is what it looked like. See the paths?

SF-DevClusterSetupScriptFix


I then saved and executed the script and VOILA! it worked.

SFSuccess


If you’re trying to get the Service Fabric local cluster setup and you’re running into issues. Give this a try (make sure you run the CleanCluster.ps first) and hopefully it will get you up and running building Azure Service Fabric applications.

FacebooktwittermailFacebooktwittermail

Azure Web Apps Backup-Restore

As you can probably tell, this blog is running on WordPress. And if you know me just a little bit you’d probably guess it’s hosted on Azure Web Apps. I love Azure Web Apps. One of the features which I have probably under-appreciated but really appreciate now is the Backup and Restore feature. I had forgotten how much I loved it until just today when it came in super handy doing something that anyone who runs WordPress has to do frequently, run updates.

Are Backups for Wimps?

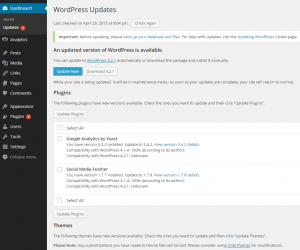
If you run a WordPress blog you probably read (or hopefully you are reading) lots of stories about a rash ofWPUpdatesAvailable recent WordPress vulnerabilities across WordPress Core and a number of very popular plug-ins. If you care about these vulnerabilities, and I hope you do, you’ve probably updated WordPress Core and some plug-ins in the last few weeks. That’s what I did today and its where the under-appreciated Backup-Restore feature for Azure Web Apps earned my renewed appreciation, and this blog post to show it.

So today I opened my blog and went to the Dashboard and I see this image above. (You can click on this to see a larger version). I have to update WordPress Core and some plug-ins and a theme too. Did you notice at the top where it says, “please back upBackupsAreForWimps your files and database”? How many times did you say, what ever. It will work. Heck, even Chuck Norris says, “Backups are for Wimps”. Who am I to argue with Walker, Texas Ranger.

So from the Dashboard I ran the update on WordPress Core. That update worked fine. Next, I updated my plug-ins, again no problem. Chuck Norris is so wise. Much more wise than that Claude Van Damme guy. I don’t need to run Backup!

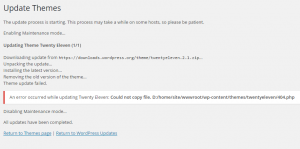
Finally I ran the update on my theme. I have a child theme on top of the WordPress Twenty Eleven theme. This allows me to update the parent theme without impacting my theme over-rides. Twenty Eleven gets updated a lot but I’ve never had any problems updating it. Unfortunately today this was not the case. When I ran the update something went horribly wrong and as you can see here, it did not update properly. In fact, it completely killed my site.

WPThemeUpdateFailed

Well, Mr. Walker, Texas Ranger, I’m here to tell you that Backups are not for Wimps. WordPress updates can and DO fail and sometimes they fail hard! And making backups, even if its for something trivial as a blog, is worth it.

Enter Azure Web Apps Backup-Restore

A couple years ago after my original blog blew up taking four years of blog posts with it, I decided that when I created my new blog I would put it on a daily backup schedule and allow Azure Web Apps to dutifully back up all my blog’s files AND DATABASE each day. Setting this up for my site is very easy and I’ll show you how easy it is. Note that you need to be running on the Standard Tier to perform the following steps.

First, open the Azure Management Portal and navigate to the Storage tab. From there create a new Storage Account. Give it a name that is easy to associate with your web app. Allow it to provision.

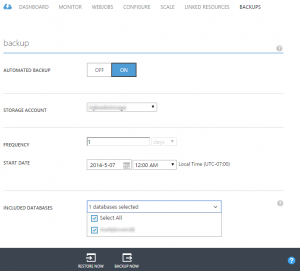
Next navigate to your app in the Web Apps AzureWebAppsBackupConfigtab. Click on your web app from the list and then click on the Backups tab. From there turn on Automated Backup and select the Storage account you provisioned, set the frequency and time to run your backup. Pick a time of day when there is very little load on your app.

Finally, click the drop down for databases and select whatever is there. THAT’S IT. Just set it and forget it. BTW, if your database is > 10GB and on Azure SQL DB you need to backup your database using the Azure SQL Database Backup. If you are using MySQL from ClearDB you need to use their Backup feature which will cost you a little bit of money.

Running a Restore

This is a feature that I had only ever run once before; when I first set it up. I wanted to make sure it worked. As you know and I’m sure your mother has told you. A disaster recovery plan that has never been tested is the same as not having a disaster recovery plan at all. As you might expect doing a restore is super simple and they run very quickly. My site restores in less than a minute, albeit my database is only 4MB in BackupRestoreOnesize. If your database is larger it will take longer to restore.

To restore a site in Azure Web Apps just go back to the Backup tab in the Azure Management Portal for your web app, then click “Restore Now” at the bottom of the screen.

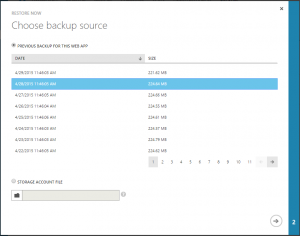
Next, select from the list of backups that have been created. Select the backup you want, generally this is BackupRestoreTwogoing to be the last backup. Then click the arrow at the bottom right.

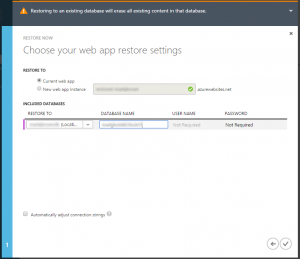
In the next screen select the Current web app to restore the backup into and make sure to select the databases too. Then click the check mark at the bottom right. That’s it. In a few minutes your site will be back to the state it was in at the last backup.

Conclusion

So that’s the Azure Web Apps Backup-Restore feature. It’s easy to setup, easy to use (because you can schedule it to run with no user interaction) and restoring your site is easy too. If your site is running on a Standard Instance you get 2 backups per day and up to 50 per day if you are running on a Premium Instance. I don’t know what you would do with 50 daily backups but there it is if you want it.

As handy as this feature is, there are a few capabilities I wish it had. For instance there is no way to set a retention policy. If you have a large site with lots of images (which you should keep in Blob Storage anyway) and/or a database that’s big in size, over the course of a year you’ll have a surprisingly large amount of storage being consumed from backups sitting in your Storage account.

The other capability I wish this feature had is the ability to restore this into an existing provisioned web app or even better, into an isolated site slot with an isolated database. Currently, you can restore your site into a new instance and also into a new database and the Restore can also automatically update your connection strings so your restored site can access the restored database in a new location. If this was simpler and more turnkey where I can restore into a new site and database and then just hit Swap that would be very cool. However, knowing the team that builds and runs Azure Web Apps, I’m betting they’ve thought about this and would not be surprised to see this or something like it in the near future, especially now with the emergence of the Premium SKU’s that are targeted at very high-end enterprise scenarios.

FacebooktwittermailFacebooktwittermail

Automating Backups with Azure WebJobs & AzCopy

In this post I will show you how to use the Azure command line utility, AzCopy in combination with Azure WebJobs to build your own scheduled Azure Storage backup utility. You can get the source for this blog post on GitHub here, AzCopyBackup

Credits

Before I start here I have to call out Pranav Rastogi who was a HUGE help to me through this process of me figuring out how to use AzCopy with WebJobs. There is not a whole lot of prior art out there for WebJobs and there is exactly zero (before now) on how to combine the two to make a service to automatically backup your Azure Storage accounts. Pranav was awesome and this blog post would not be possible with out his help.

What is AzCopy?

If you follow Azure you may have heard of AzCopy. This tool was released not so long ago and is a very handy command-line utility which can be used to backup blobs, tables and files stored in Azure. One of the absolute best features of AzCopy is that it copies Azure Storage objects asynchronously server-to-server, meaning that you can run AzCopy sitting in an airplane using crappy airplane WiFi and it will copy your stuff without having to download storage objects locally and then push it back up to the cloud. I really love this tool. If I had one nit to pick, it would be I wished this was released as a DLL and was more interactive with the process that was hosting it; I’ll talk about why a bit later. That said, it’s simple to use. For instance. If I wanted to copy everything from one Container to another recursively (/S) going through everything you would do this in a batch file.

AzCopy /source:https://mystorageacct1.blob.core.windows.net/mycontainer/ /dest:https://mystorageacct2.blob.core.windows.net/mycontainer/ /sourcekey:[sourcekey] /destkey:[destkey] /S

Getting started

For this blog post I’m going to create 4 different projects all inside a single Visual Studio solution. Here they are below.

  1. A Website in Azure Websites to host the WebJobs.
  2. A scheduled WebJob to queue up a full backup on two Containers.
  3. A scheduled WebJob to queue up incremental backups on the same Containers.
  4. A WebJob that reads from that same queue and executes AzCopy to do the work.

Logical Model
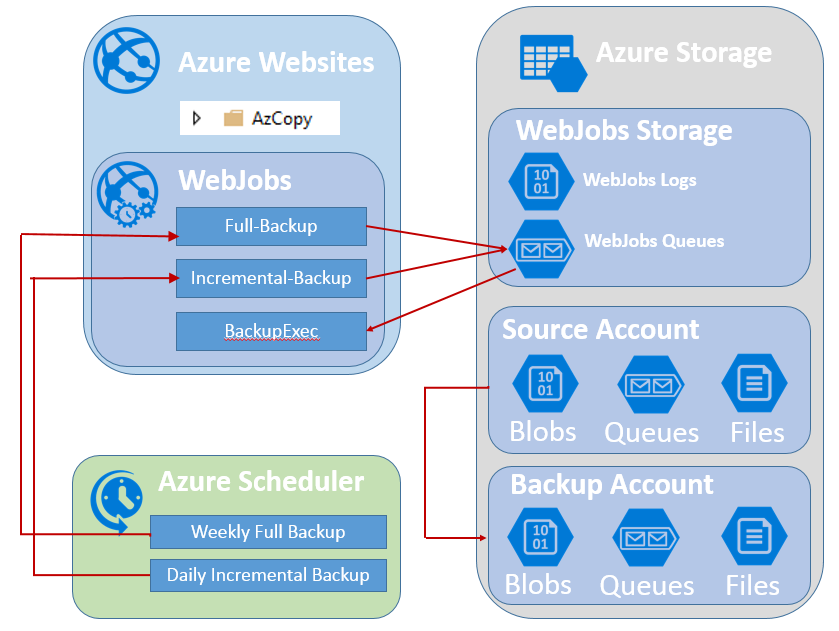
1-WebJobBackup_Model

Above you can get an idea of the logical items in this solution. Azure Websites is the host for both the WebJobs and is also where we deploy AzCopy to. Azure Storage includes three storage accounts. The source and destination accounts that are in the backup and a third account that is required by WebJobs. Lastly Azure Scheduler is used to schedule the WebJobs to be run.

Create a new Website to host the WebJobs

First, create a new Website in Azure Websites. You can create WebJobs and attach them to an existing Website in Visual Studio. For now let’s create a new website.
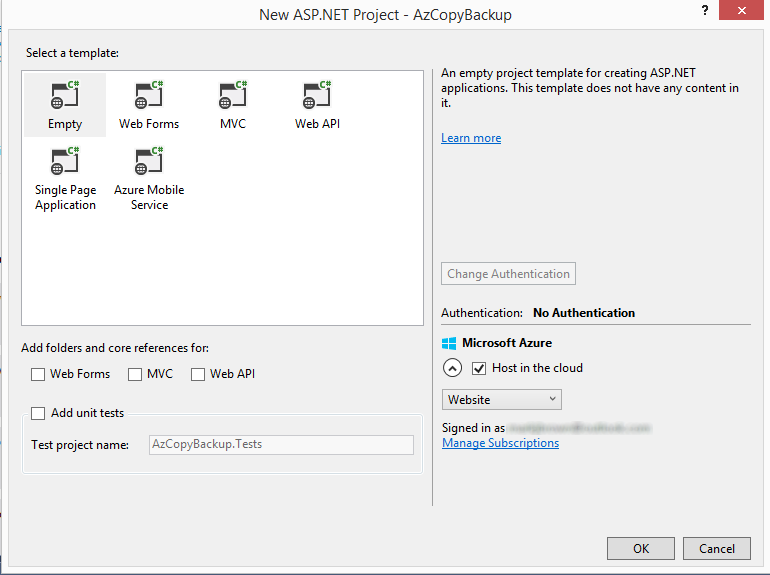
1-7-blog-backup-NewWebProject

Create a WebJobs Storage Account

WebJobs uses its own Azure Storage Account for it’s Dashboard in Kudu. Create a storage account in the portal. Put it in the same region as the host website. You will need to create a unique name for this storage account. Figure out your own name, use it here and remember it because you will need it here again shortly.
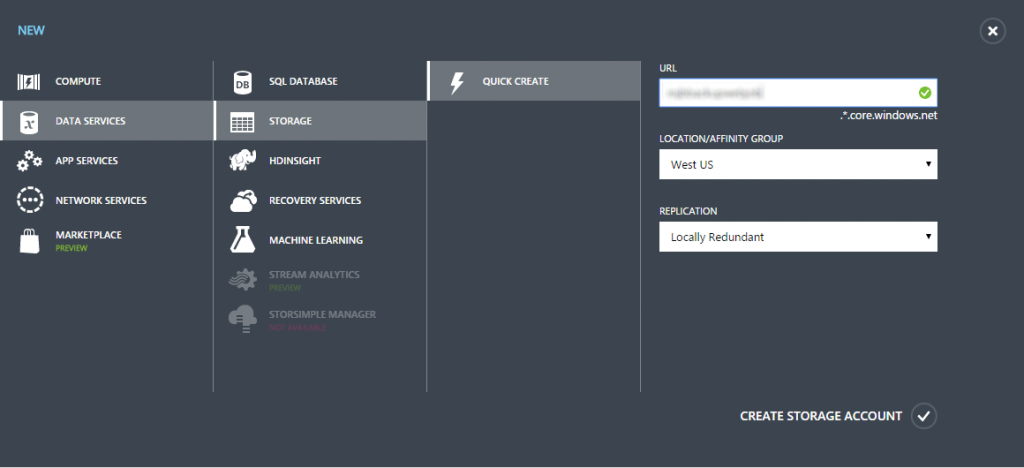
2-WebJobsStorageAccount

WebJobs requires the connection string for this storage account be put in two environment variables, AzureWebJobsDashboard and AzureWebJobsStorage. You can put these in the app.config for the WebJob but since we are going to be creating multiple WebJob projects we will store these as connection strings in the Azure Management Portal of the host website.

Collecting storage account names and keys

Next get the Account Name and Access Key for the new WebJobs storage account.
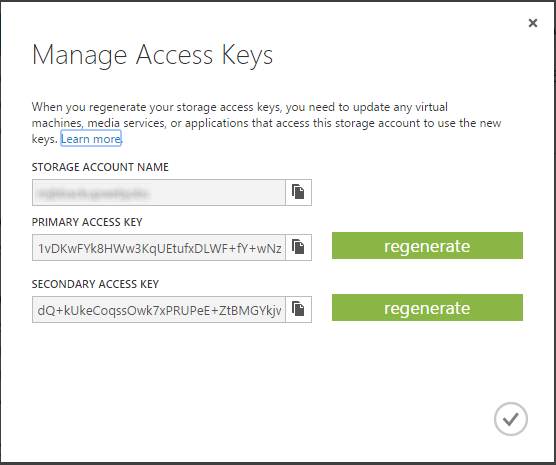
3-WebJobsStgKeys

You’re going to be collecting the account name and keys for the source and destination to run the backup on so create a new text file and paste this information into it. Create a storage connection string for both AzureWebJobsDashboard and AzureWebJobsStorage using the connection string format below.

4-connectionstuffinfile

Next, get the storage account name and keys for the storage accounts to copy from and to. For the storage account name and keys, separate them with a semi-colon. Collect all this information and put in a text file in a format that looks like this above, just to keep handy for the next step.

Save Connection Strings in Azure Management Portal

With all of the storage account information, save all these in connection strings in the Azure Management Portal. Navigate to the Configure tab for the host website and scroll down to connection strings. From your text file, cut and paste the contents of the text file into the connection string settings. When you have gone through all the values, your connection strings should look like this.

5-connstrings

Create WebJob to do a Full Backup

Next, right click on the Website in Visual Studio and select, Add and New Azure WebJob Project. This WebJob will do a full backup from a container called, “images” and another called, “stuff” from the “Source-Account” to the “Backup-Account”. When it copies the contents it will create new containers in the Backup-Account with the same name as the source, but with a date stamp appended to the name. This will effectively create weekly snapshots of the containers.
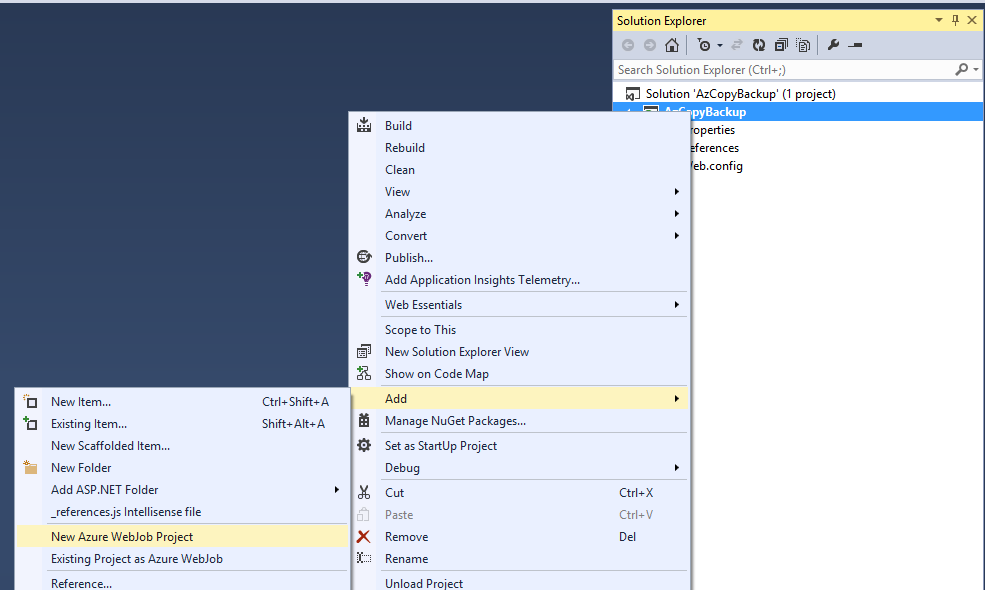
2-AzCopyBackup-NewWebJob

Next, enter the name “Full-Backup” for the WebJob and the schedule information. For this WebJob it will run every Friday night at 7pm Pacific time with no end date.
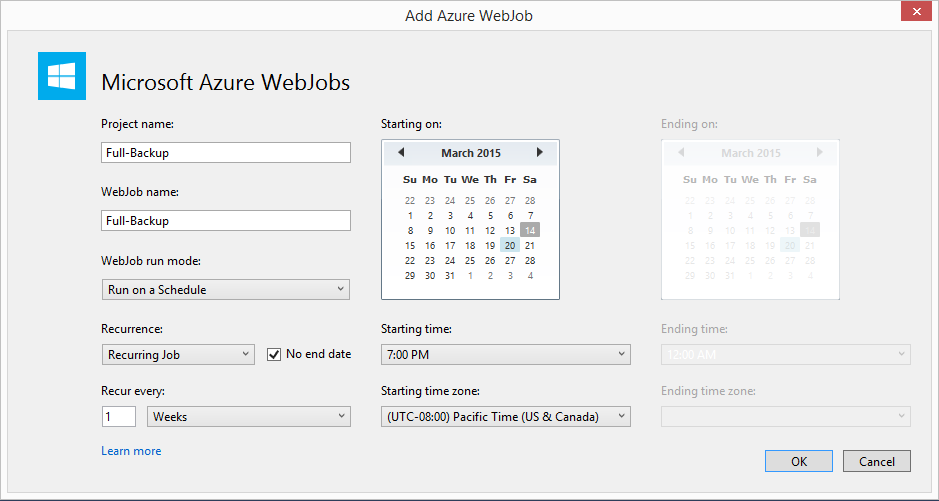
3-WebJobSchedule

Coding the Full Backup Job

After the project is created, open References in VS and add System.Configuration as a reference in the project. Next replace the code in Program.cs (this should be open by default when the project is created) with the code shown below.

using System;
using System.Collections.Generic;
using System.Linq;
using System.Text;
using System.Threading.Tasks;
using Microsoft.Azure.WebJobs;
 
namespace Full_Backup
{
    class Program
    {
        static void Main()
        {
            var host = new JobHost();
            host.Call(typeof(Functions).GetMethod("QueueBackup"));
        }
    }
}

Next, open the Functions.cs file and replace the code in that file with the code below, including the using statements. The last three are not included by default in a WebJob project.

PS: sorry for the way the source code looks here. Trying to find a better way to do this.

using System.Collections.Generic;
using System.IO;
using System.Linq;
using System.Text;
using System.Threading.Tasks;
using Microsoft.Azure.WebJobs;
using System;
using System.Configuration;
using Newtonsoft.Json;
 
namespace Full_Backup
{
    public class Functions
    {
        [NoAutomaticTrigger]
        public static void QueueBackup([Queue("backupqueue")] ICollector<string> message, TextWriter log)
        {
            //extract the storage account names and keys
            string sourceUri, destUri, sourceKey, destKey;
            GetAcctInfo("Source-Account""Backup-Account"out sourceUri, out destUri, out sourceKey, out destKey);
 
            //create a job name to make it easier to trace this through the WebJob logs.
            string jobName = "Full Backup";
 
            //Use time stamps to create unique container names for weekly backup
            string datestamp = DateTime.Today.ToString("yyyyMMdd");
 
            //set backup type either "full" or "incremental"
            string backup = "full";
 
            //Add the json from CreateJob() to the WebJobs queue, pass in the Container name for each call
            message.Add(CreateJob(jobName, "images", datestamp, sourceUri, destUri, sourceKey, destKey, backup, log));
            message.Add(CreateJob(jobName, "stuff", datestamp, sourceUri, destUri, sourceKey, destKey, backup, log));
        }
        public static void GetAcctInfo(string from, string to, out string sourceUri, out string destUri, out string sourceKey, out string destKey)
        {
            //Get the Connection Strings for the Storage Accounts to copy from and to
            string source = ConfigurationManager.ConnectionStrings[from].ToString();
            string dest = ConfigurationManager.ConnectionStrings[to].ToString();
 
            //Split the connection string along the semi-colon
            string sourceaccount = source.Split(';')[0].ToString();
            //write out the URI to the container 
            sourceUri = @"https://" + sourceaccount + @".blob.core.windows.net/";
            //and save the account key
            sourceKey = source.Split(';')[1].ToString();
 
            string destaccount = dest.Split(';')[0].ToString();
            destUri = @"https://" + destaccount + @".blob.core.windows.net/";
            destKey = dest.Split(';')[1].ToString();
        }
        public static string CreateJob(string job, string container, string datestamp, string sourceUri, string destUri, string sourceKey, string destKey, string backup, TextWriter log)
        {
            //Create a Dictionary object, then serialize it to pass to the WebJobs queue
            Dictionary<stringstring> d = new Dictionary<stringstring>();
            d.Add("job", job + " " + container);
            d.Add("source", sourceUri + container + @"/");
            d.Add("destination", destUri + container + datestamp);
            d.Add("sourcekey", sourceKey);
            d.Add("destkey", destKey);
            d.Add("backup", backup);
            log.WriteLine("Queued: " + job);
 
            return JsonConvert.SerializeObject(d);
        }
    }
}

Here is what the functions in this class do.

QueueBackup()

This function is called by Main() when the WebJob is executed by the Scheduler. WebJobs includes a built-in queue and log capability. You access them by including them in a function’s signature. I have named the queue in this application “backupqueue”. I have declared the datatype for the message for the queue to be a string and since this function will add more than one message to the queue, add the ICollector interface in front of the string parameter for the [queue]. The built-in log is very helpful when debugging because you cannot attach an on demand or scheduled WebJob to the debugger.

Tip: On Demand and Scheduled WebJobs cannot be attached to the debugger so using the built-in logging feature is very helpful.

The bulk of the work in this function happens on message.Add(). Each call to message.Add() includes a call to CreateJob() and passes in a job name, the container name, the storage account information, the type of backup and the built-in WebJobs logger so it can write a log entry for the backup job that is added to the queue.

GetAcctInfo()

This function gathers the storage account information from the host website’s connection strings we saved earlier. It takes that information and returns 4 output values as output parameters. The URI and key for the storage account to copy from, and the URI and key for the storage account to back it up to. I am hard coding the blob here for the URI. You can change it to table or queue if you want or make it a parameter so the function can queue up a backup job for all three types of storage objects.

Note: Yes I’m using output values. In this instance I found it cleaner and easier to use for this sample than creating a class to store the returned data. If you don’t like it then feel free to change it.


CreateJob()

This function creates a Dictionary object that is built around the command line arguments that AzCopy needs to copy storage accounts from one place to another. This function returns a serialized Json string of the Dictionary object. This Json will be the queue message. Note the date stamp parameter appended to the container name. This ensures unique weekly snapshots of the container being backed up.

Why am I doing this?

By now, you may be thinking, Dude, WTF? Why create a WebJob that puts command-line arguments for AzCopy on a queue? Just run AzCopy!!!dude-wtf

The reason is two-fold. First, AzCopy can only be run one instance at a time by the JobHost in WebJobs. By putting the backup jobs on a queue I can ensure that AzCopy only runs one instance at a time because I can limit how many messages are read and executed at a time in WebJobs (I’ll show you how later).

The second reason is because this pattern allows this app to scale. While I can only run AzCopy one instance at a time per JobHost (one per VM), you are not limited by the number of VM’s that can be run. Since Azure Websites can be scaled to two or more VM’s, this solution can allow AzCopy to run multiple times simultaneously. The example here is only doing a simple back-up of a couple of containers, but by applying this pattern, you can use this code to spawn multiple backup jobs for any number of storage accounts of any size and scale up as you see fit. In addition, by creating smaller units to back up, you can create more of them to run in parallel. You then can control the speed (or the cost) with which the entire set of jobs runs by setting the maximum number of instances to scale.

Create a WebJob to do an Incremental Backup

Next repeat the steps to create the Full-Backup WebJob and create a new WebJob “Incremental-Backup” that will queue a message to perform an incremental backup. This one will run Monday through Thursday only. The full backup runs on Friday so we don’t need to run it then. Saturday and Sunday we’ll assume nothing happens so we’ll not run it then either.

Create a new WebJob by right-clicking on the Website project and select Add New WebJob. Next, set the name and schedule for the WebJob.
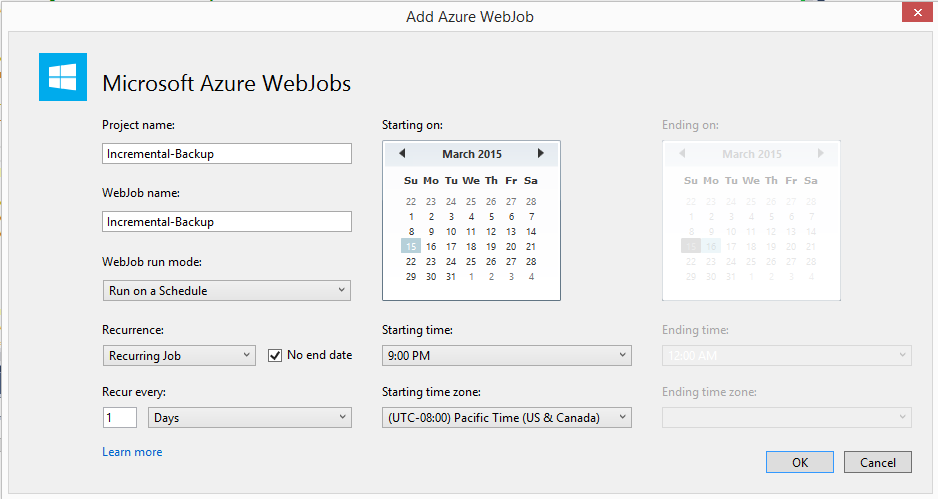
9-incrWebJob

Next, open the References for the project and select, Add Reference. Then add System.Configuration to the project. Next copy and paste the code here into program.cs

using System;
using System.Collections.Generic;
using System.Linq;
using System.Text;
using System.Threading.Tasks;
using Microsoft.Azure.WebJobs;
 
namespace Incremental_Backup
{
    class Program
    {
        static void Main()
        {
            var host = new JobHost();
            host.Call(typeof(Functions).GetMethod("QueueBackup"));
        }
    }
}

Next, open up functions.cs and cut and paste this code, including the using statements.

using System.Collections.Generic;
using System.IO;
using System.Linq;
using System.Text;
using System.Threading.Tasks;
using Microsoft.Azure.WebJobs;
using System;
using System.Configuration;
using Newtonsoft.Json;
 
namespace Incremental_Backup
{
    public class Functions
    {
        [NoAutomaticTrigger]
        public static void QueueBackup([Queue("backupqueue")] ICollector<string> message, TextWriter log)
        {
            //This job should only run Monday - Thursday. So if it is Friday, Saturday or Sunday exit here.
            DateTime dt = DateTime.Now;
            if (dt.DayOfWeek == DayOfWeek.Friday || dt.DayOfWeek == DayOfWeek.Saturday || dt.DayOfWeek == DayOfWeek.Sunday) return;
 
            //Get timestamp for last Friday to save incremental backup to the last full backup
            while (dt.DayOfWeek != DayOfWeek.Friday) dt = dt.AddDays(-1);
            string datestamp = dt.ToString("yyyyMMdd");
 
            //extract the storage account names and keys
            string sourceUri, destUri, sourceKey, destKey;
            GetAcctInfo("Source-Account""Backup-Account"out sourceUri, out destUri, out sourceKey, out destKey);
 
            //create a job name to make it easier to trace this through the WebJob logs.
            string jobName = "Incremental Backup";
 
            //set backup type either "full" or "incremental"
            string backup = "incremental";
 
            //Add the json from CreateJob() to the WebJobs queue, pass in the Container name for each call
            message.Add(CreateJob(jobName, "images", datestamp, sourceUri, destUri, sourceKey, destKey, backup, log));
            message.Add(CreateJob(jobName, "stuff", datestamp, sourceUri, destUri, sourceKey, destKey, backup, log));
        }
        public static void GetAcctInfo(string from, string to, out string sourceUri, out string destUri, out string sourceKey, out string destKey)
        {
            //Get the Connection Strings for the Storage Accounts to copy from and to
            string source = ConfigurationManager.ConnectionStrings[from].ToString();
            string dest = ConfigurationManager.ConnectionStrings[to].ToString();
 
            //Split the connection string along the semi-colon
            string sourceaccount = source.Split(';')[0].ToString();
            //write out the URI to the container 
            sourceUri = @"https://" + sourceaccount + @".blob.core.windows.net/";
            //and save the account key
            sourceKey = source.Split(';')[1].ToString();
 
            string destaccount = dest.Split(';')[0].ToString();
            destUri = @"https://" + destaccount + @".blob.core.windows.net/";
            destKey = dest.Split(';')[1].ToString();
        }
        public static string CreateJob(string job, string container, string datestamp, string sourceUri, string destUri, string sourceKey, string destKey, string backup, TextWriter log)
        {
            //Create a Dictionary object, then serialize it to pass to the WebJobs queue
            Dictionary<stringstring> d = new Dictionary<stringstring>();
            d.Add("job", job + " " + container);
            d.Add("source", sourceUri + container + @"/");
            d.Add("destination", destUri + container + datestamp);
            d.Add("sourcekey", sourceKey);
            d.Add("destkey", destKey);
            d.Add("backup", backup);
            log.WriteLine("Queued: " + job);
 
            return JsonConvert.SerializeObject(d);
        }
    }
}

This code is nearly identical to what we have in Full-Backup, but there are two key differences. I’ll highlight them in this image below.

10-incrDatestuff

First, you may have noticed that we said this WebJob would only run Monday – Thursday. However, when we created the WebJob in Visual Studio we set it to run daily. To do the custom schedule I am checking the current date when the job runs and if it falls on Friday, Saturday or Sunday the code calls return and exits out of the routine so the WebJob never queues a backup.

Second, for an incremental copy to work, AzCopy needs something to compare to. Since we have a full backup created every Friday we need to find the previous Friday’s full backup and do the incremental backup to that container.

So we now have three of the four things created for this solution. The last is the WebJob that executes AzCopy. Let’s create that next.

Create the Backup Exec WebJob

Again, right click on the website in Visual Studio and add another WebJob project. We’ll call this one BackupExec. Set the parameters to match what’s here below, most notably, this job is to run continuously.
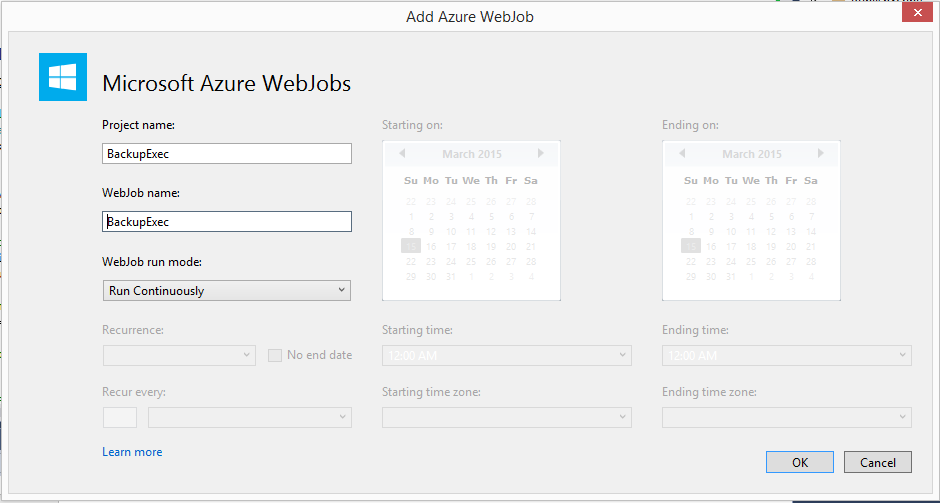
11-backupexec

Coding the Backup Exec WebJob

First, open the program.cs file and replace the code in it with this.

using System;
using System.Collections.Generic;
using System.Linq;
using System.Text;
using System.Threading.Tasks;
using Microsoft.Azure.WebJobs;
 
namespace BackupExec
{
    class Program
    {
        static void Main()
        {
            JobHostConfiguration config = new JobHostConfiguration();
 
            //AzCopy cannot be invoked multiple times in the same host
            //process, so read and process one message at a time
            config.Queues.BatchSize = 1;
            var host = new JobHost(config);
            host.RunAndBlock();
        }
    }
}

Normally, a continuously running WebJob will read and process up to 16 messages at one time from a queue. Because we can only run AzCopy once per host process we need to modify this code and set Queues.BatchSize = 1. This ensures that AzCopy is only run once per JobHost process.

As mentioned earlier, to run AzCopy multiple times simultaneously, provision or schedule multiple VM’s or turn on auto-scale.

Note: AzCopy is not a very resource intensive application. You can easily run on a small standard tier VM or even basic tier, if you don’t need auto-scale.

Next open functions.cs and replace the code in that file with this code below.

using System;
using System.Collections.Generic;
using System.IO;
using System.Linq;
using System.Text;
using System.Threading.Tasks;
using Microsoft.Azure.WebJobs;
using System.Diagnostics;
using Newtonsoft.Json;
 
namespace BackupExec
{
    public class Functions
    {
        // This function will get triggered/executed when a new message is written on the Azure WebJobs Queue called backupqueue
        public static void ExecuteAzCopy([QueueTrigger("backupqueue")] string message, TextWriter log)
        {
            string apptorun = @"D:\home\site\wwwroot\AzCopy\AzCopy.exe";
            Dictionary<stringstring> d = JsonConvert.DeserializeObject<Dictionary<stringstring>>(message);
            log.WriteLine("Start Backup Job: " + d["job"] + " - " + DateTime.Now.ToString());
 
            StringBuilder arguments = new StringBuilder();
            arguments.Append(@"/source:" + d["source"]);
            arguments.Append(@" /dest:" + d["destination"]);
            arguments.Append(@" /sourcekey:" + d["sourcekey"]);
            arguments.Append(@" /destkey:" + d["destkey"]);
            //backup type: if "incremental" add /XO switch to arguments
            arguments.Append(@" /S /Y" + ((d["backup"] == "incremental") ? " /XO" : ""));
 
            ProcessStartInfo info = new ProcessStartInfo
            {
                FileName = apptorun,
                Arguments = arguments.ToString(),
                UseShellExecute = false,
                RedirectStandardInput = true,
                RedirectStandardError = true,
                RedirectStandardOutput = true,
                ErrorDialog = false,
                CreateNoWindow = true
            };
 
            Process proc = new Process();
            proc.StartInfo = info;
            proc.Start();
            //max wait time, 3 hours = 10800000, 2 hours = 7200000, 1 hour = 3600000
            proc.WaitForExit(10800000);
 
            string msg = proc.StandardOutput.ReadToEnd();
            log.WriteLine(msg);
            log.WriteLine("Complete Backup Job: " + d["job"] + " - " + DateTime.Now.ToString());
            proc = null;
        }
    }
}

I’ll explain a bit what this code does.

When this WebJob loads this function is waiting for a new item to be written to “backupqueue”. When it does, it begins to execute. The function reads the Json message, deserializes it into a Dictionary object, iterates through the Dictionary and builds a string of command line arguments for AzCopy to use to run the backup.

The function then creates a new ProcessStartInfo object. We need this so AzCopy will execute properly hosted inside a WebJob. Next it creates a new Process and calls Start().

Finally, since AzCopy can sometimes run and run and run and run, we need a way to stop it so we need WaitForExit() so the WebJob will stop after a set period of time. In this example here I am hard coding the value. In a real-world scenario you may want time each backup job and set the value to be longer than what it normally takes to complete.

I also need to point out that sometimes AzCopy stops for no apparent reason. This is the reason why I wish AzCopy was a DLL that allowed me to capture errors and handle them. It’s part of the weakness for running a process inside another. To me it’s worth the trade-off. You may want to go and check the Full-Backup to ensure it ran properly. If it doesn’t, WebJobs has a handy feature allowing you to requeue the message “Replay Function” and kick off the backup job again. Again, if you wanted to get fancy you could probably create a separate process to monitor the WebJob logs and restart the WebJob. That’s a bit out of scope for what is already a really long blog post.

Include AzCopy in the project

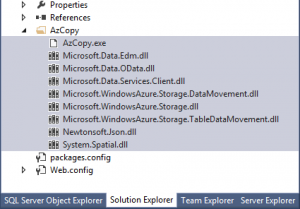
Finally, we need to include AzCopy in this project. This project was built using version 3.x. To do this you need to download AzCopy. You can download it from this article on AzCopy. Once you download it, go grab the folder from the location shown in the article and copy it to the website’s project folder in Visual Studio.
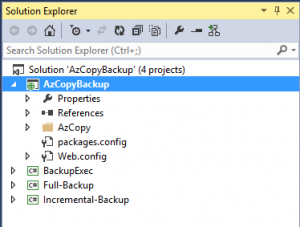
7-1-AzCopyFolder

Make sure after you copy the AzCopy folder to the project to set Copy to Output Directory to Copy always
8-AzCopyCopyAlways

So that’s it. Next, build the project and deploy it to Azure.

Let’s Test it

Navigate to the host website in the Azure Management Portal and go to the WebJobs tab. You should see this.

9-WebJobsInPortal

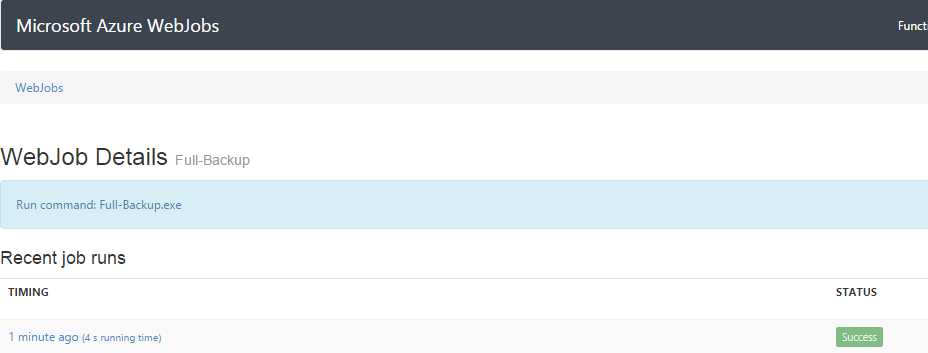
After it deploys we can test it. Throw some files in the “images” and “stuff” containers you created earlier in the “source” storage account. Next click on “Run Once” at the bottom of the Management Portal screen, then click on the URL for the “Full-Backup” in the LOGS column. In a moment you should see a screen like this.
15-fullbackup

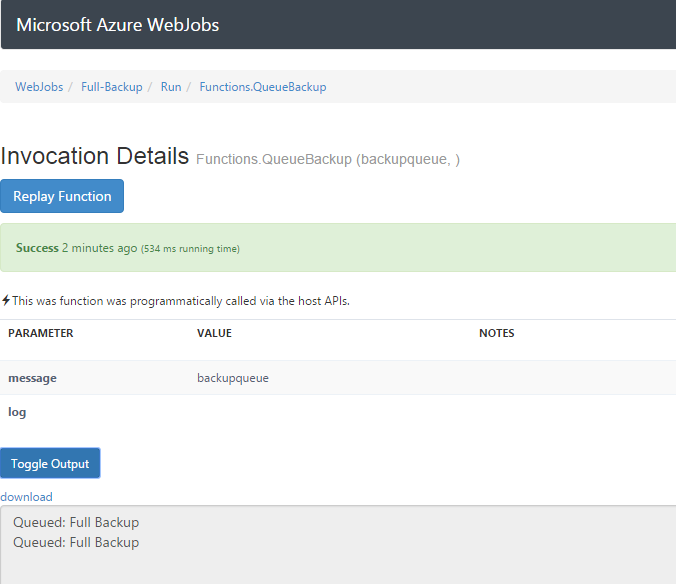
Click on the hyperlinked function under “Recent job runs” and then click, “Toggle Output” and you should see two messages. Those were created when we used the log.writeline() in the Full-Backup job.
16-queuedbackup

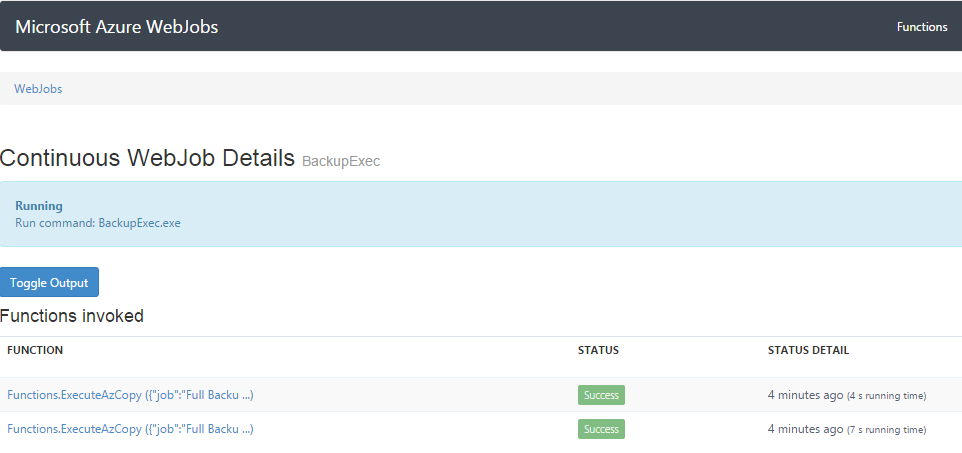
Next, go back to the Management Portal. Then click on the log URL for the BackupExec WebJob. You should see this.
17-backupexec

Click on either of the hyper-linked items under “functions included” and then, Toggle Output and you should see this.
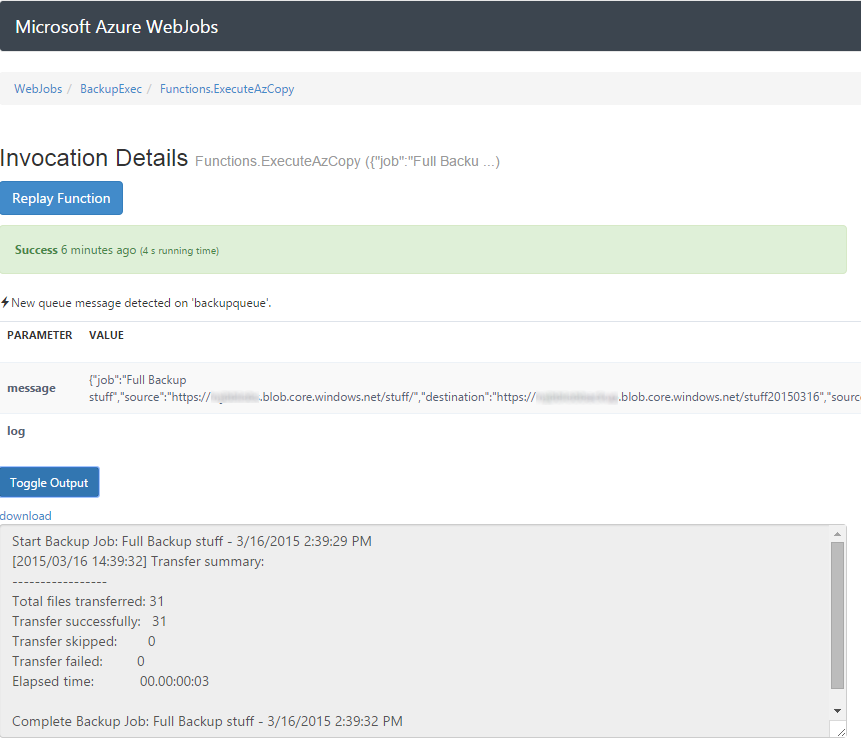
10-backupexecoutput

There’s a lot of data inside this job. At the top there is the name of the job and the time it started. That’s from our use of log.WriteLine() at the beginning of the ExecuteAzCopy() in the BackupExec WebJob. Next is the standard output generated by AzCopy.exe, then finally our last log.WriteLine() that shows the completion of the task.

So that’s basically it. I realize this was a long blog post. I’ve put this project up on GitHub, AzCopyBackup so you can get the code and then just follow along. Hope you enjoyed this and hope you find it useful.

FacebooktwittermailFacebooktwittermail

Running Linux Desktops in Azure

I’ve worked on and off with Linux for years. All of it using Linux as a web server. Generally I am most comfortable using Windows as my dev environment, although I love Mac too.

Lately I’ve wanted to develop web apps in a Linux environment using Linux-based tools and then deploy those to a Linux server. I haven’t bothered yet to go purchase a bunch of super fast USB 3.0 storage yet so I looked at creating a Linux VM in Azure and using that instead.

Note: I should note that I started this process by searching for existing information on how to do this. However, what I found either didn’t work or forced me to do something I didn’t want  (i.e. install Cyg-Win and use X-Windows, or install vncViewer, etc.). A number of blog posts I found missed a couple of key pieces of info that tripped me up as I followed them. The best topic I found on doing this was this one on Ubuntu Tutorials, Remote desktop to Ubuntu 12.04 from Windows 7. I want to make sure I cite this as the source (there is no author unfortunately or I would credit that person out directly) I used that was clearly written and actually worked.

Ok, with that out of the way, let me walk you through the steps I followed to create a desktop Linux environment using a Linux VM in Azure.

Step 1: Provision a Linux VM

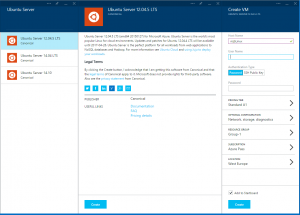
Fire up the Azure Management Portal and provision a new Ubuntu VM. Since our purpose here is to enable an interactive remote user login to this VM we we are going to specify a user name and strong password rather than a SSH key.

Ubuntu 12.04 LTS

Note: This is super critical and its where I got tripped up using information I found online. You have to use 12.04 LTS. I tried 14.04 and despite numerous attempts I could not get it to work. (Update: Apparently this works with 15.10 per a comment below)


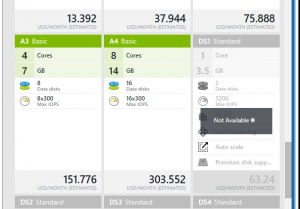
Step 2: Selecting VM Instance Sizes

While provisioning your VM you will need to select a VM size. You may be tempted to create a small VM because after all it’s not doing much. Don’t do this. I tried this using a small VM and screen refreshes were painfully slow. (Move the mouse and go grab a coffee slow) Medium was better but still unusable as a desktop. You need a VM with lots of CPU power to handle screen draws. I selected a Basic Large because I don’t need load balancing or other features. Yes it costs $300/month but I don’t need to run this 24/7. I have it running at most 30 hours a month so that’s less than $15 a month.

VM Pricing

Step 3: Open the Remote Desktop Protocol Port

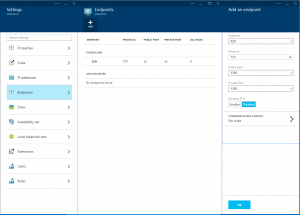
After the VM has been successfully provisioned you need to open the right port so you can connect to it via RDP. To connect to the VM using RDP, open port 3389. To do that click on Properties for the VM in the Azure Management Portal, select End Points and then you create an end point in the Azure Portal.

add RDP endpoint

Note: you can change the port you use for RDP if you want but you will need to edit the xrdp.ini file in your Linux VM after you install RDP. To do that SSH into the VM and navigate to /etc/xrdp/xrdp.ini and edit the Port number, it’s at the end of the file. Save the file, quit VIM and then reboot the VM to ensure it’s listening on the right port.


Step 4: Connect via SSH

After the VM is ready you need connect to it so you can update apt-get, install a desktop environment and install RDP. In the old days one would use a utility like PuTTY to provide Windows users a UNIX/Linux command shell from which you could connect to remote Linux machines and do stuff. However, if you have Git Bash installed you already have everything you need. Just open Git Bash and type the following:

ssh username@mylinuxvm.cloudapp.net

Tip:There is also another tool that if you aren’t using you should called ConEmu. This is by far the best shell I’ve ever used. It replaces the Windows shell, GitBash, and PowerShell with a single app. Go install it now. I’ll wait.


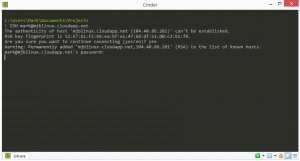
So next fire up the ConEmu shell and SSH into your new Linux VM.

ssh to linux vm

Step 5: Update apt-get

Once connected you need to update your VM’s package repository to make sure it has the latest references for software packages available and their dependencies. This is a critical step. Your installations will fail otherwise. To update apt-get, at the SSH prompt enter the following below, then go get a coffee. This can take about 5-10 minutes to run.

sudo apt-get update

Step 5: Install a Linux Desktop

With that complete you can now install a desktop package. There are a number you can choose from, I am really becoming a big fan of XFCE. It is extremely light weight and takes minutes to install versus Ubuntu Desktop which is a beast and includes things like Libre Office and other stuff I don’t need and can take up to an hour to download and install. To install XFCE, enter the following:

sudo apt-get install xfce4

Step 6: Install RDP on Linux

With your desktop successfully installed you can now install RDP on the Linux VM. To install this simply type:

sudo apt-get install xrdp

Step 7: Open the Windows RDP Client

We now have the RDP service running on Linux and a desktop into which we can log into. Next open the Remote Desktop Connection in Windows and type in the host name of your VM.

RDP Dialog

Tip: Be sure to type in the name you used when you created the VM and click “Save” under Connection Settings. If you don’t do this Windows will stubbornly try to log you in to the VM using your cached Windows credentials.

Step 8: Login

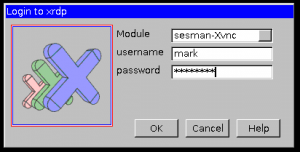
Next click Connect in Windows RDP client and enter your Linux VM password in the dialog shown here.

RDP Login

Note: If you’re seeing your cached Windows credentials in the username, hit cancel and go back to the RDP client in Windows and enter your user name again and then click, Save.


Step 9: Enjoy your new Linux dev machine

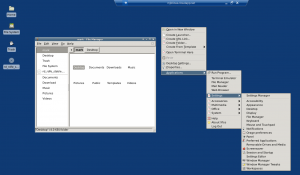
And that’s it. If you’re using XFCE you’ll see this when you first log in. Just select Use Default Config.

Default Panel

You can then begin customizing your desktop environment, installing other packages, applications, etc. and start using your VM as a Linux dev environment.

XFCE Desktop


FacebooktwittermailFacebooktwittermail